Azure Policy Inheritance

· 4 min read

Today, we are going to look into demystifying Azure Policy inheritance and how it works, so let’s do some testing.

In my tests – I have a single resource group named: AzPolicy-Test. This resource group has been placed in the Australia East region.

Now that we have a Resource Group to use in our testing, I need a policy – to keep things simple, I am going use the built-in policy of: AllowedLocations. This policy will allow us to control which region we can deploy our Azure resources into.

Scenario #1 – Policy assigned to the subscription with Allow Australia East ONLY

I have assigned my Azure Policy to a Subscription, that contains my AzPolicy-Test Resource Group. I have set the Allowed Locations to: Australia East.
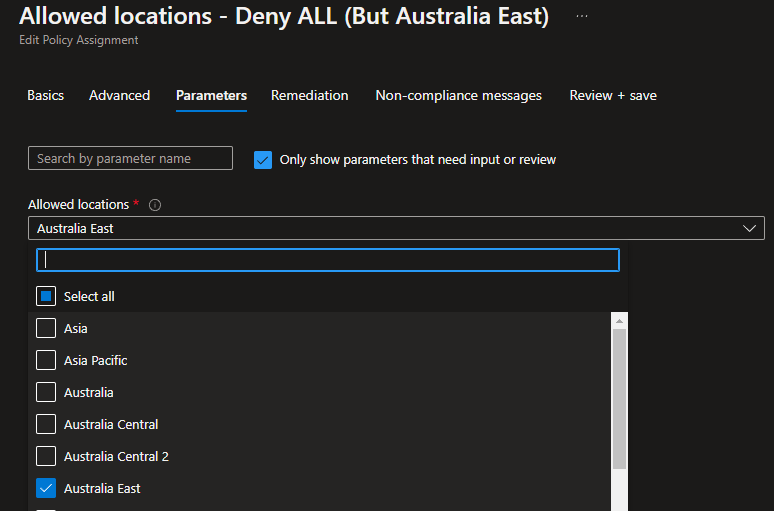
Azure Policy - Allowed locations

Let us do some testing, and try to deploy an Azure Resource (in my example, an Azure Storage account) into my Resource Group:

Can I deploy to Australia East?Yes
Can I deploy to UK South?No

As you can see my storage account deployed into Australia East successfully… as expected!

Azure Portal - filtered by location

Now, lets try and deploy a Storage account into the same Resource Group, but in the UK South region.

As Azure Resource Manager is analysing and verifying the inputs give it – it now knows there is an Azure Policy – enforcing specific locations and preventing my deployment into the UK South.
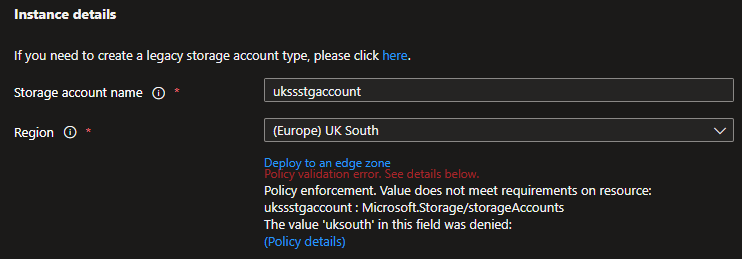
Azure Storage Account - Deny UK South deployment

This is as expected, and even if I were to use another resource group – I still won’t be able to create resources in other regions.

Scenario #2 – Policy assigned to the subscription with Allow Australia East but another policy with Allow UK South only on the Resource Group

Now that we know, we can create resources in Australia East – lets assign the same ‘Allowed Locations’ policy to the Resource Group, but Denying Australia East, and Allowing UK South. The policy allowing Australia East will still remain assigned to the subscription.
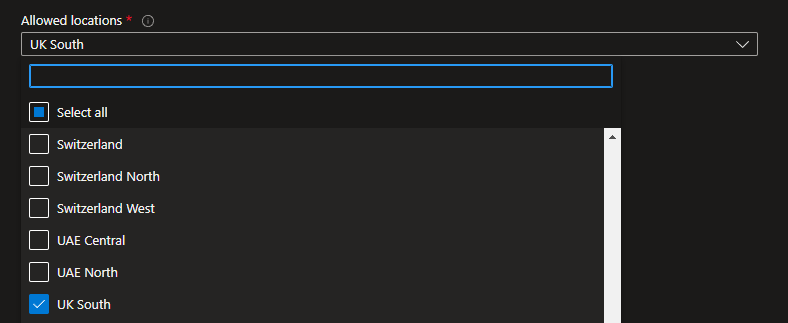
Azure Policy - Allowed locations - UK South

Let us do some testing, and try to deploy an Azure Resource (in my example, an Azure Storage account) into my Resource Group:

Can I deploy to Australia East?No
Can I deploy to UK South?No

Azure Storage account deployment - Policy validation error

Azure Storage account deployment - Policy validation error

I can’t deploy to either UK South or Australia East, even though I have 2 separate policies, one policy allowing Australia East (deployed at the subscription) and one policy allowing UK South (deployed at the Resource Group).

In this case, the policies have worked together, with the most restrictive of them both in effect – which is Deny.

Review

So lets review, originally you might think that like Group Policy – the last policy wins – this is not always the case, when conflicting policies are assigned at different levels, the policy at the highest level in the hierarchy takes precedence over policies at lower levels. When preforming a Modify or Create on a resource – the Azure resource provider checks with the Azure Policy engine.. When deciding what policy to take the Azure Policy engine, will analyze all policies together (like the above scenarius, where both deployment to UK South and Australia East were in effect - however the most restrictive won).

There are, however, various effects which are analysed first.
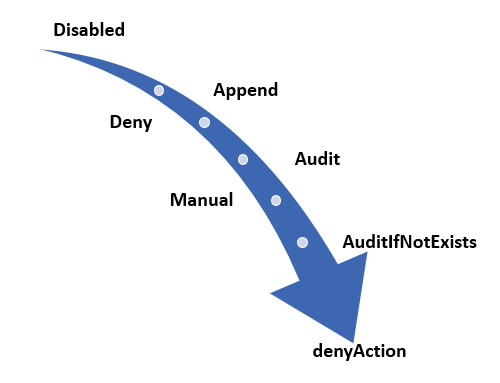
Azure Policy Effects

  1. Disabled is checked first to determine whether the policy rule should be evaluated.
  2. Append and Modify are then evaluated. Since either could alter the request, a change made may prevent an audit or deny effect from triggering. These effects are only available with a Resource Manager mode.
  3. Deny is then evaluated. By evaluating deny before audit, double logging of an undesired resource is prevented.
  4. Audit is evaluated.
  5. Manual is evaluated.

After the Resource Provider returns a success code on a Resource Manager mode request, AuditIfNotExists and DeployIfNotExists evaluate to determine whether additional compliance logging or action is required.

Remember that policy enforcement occurs during resource deployment or updates. Existing resources are not retroactively affected unless a manual remediation is performed.

The following Microsoft Learn documents are worth a read, if interested further.

Web Content Not Found on Azure Storage Account

· 2 min read

Azure Storage accounts can host static websites by opening up a public endpoint to an Azure storage container ($web), so anything inside of $web will be accessible publicly.

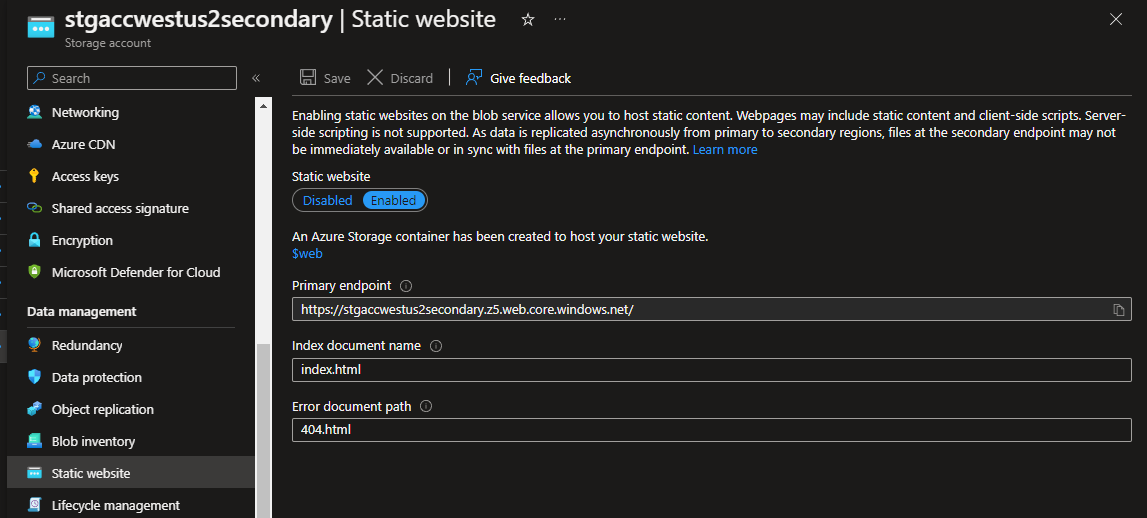
This can be enabled easily by toggling the Static website to Enabled.

Azure Storage Account - Static website

Once enabled, the Azure storage account will add a NEW endpoint - <storageaccname>.z*.web.core.windows.net.

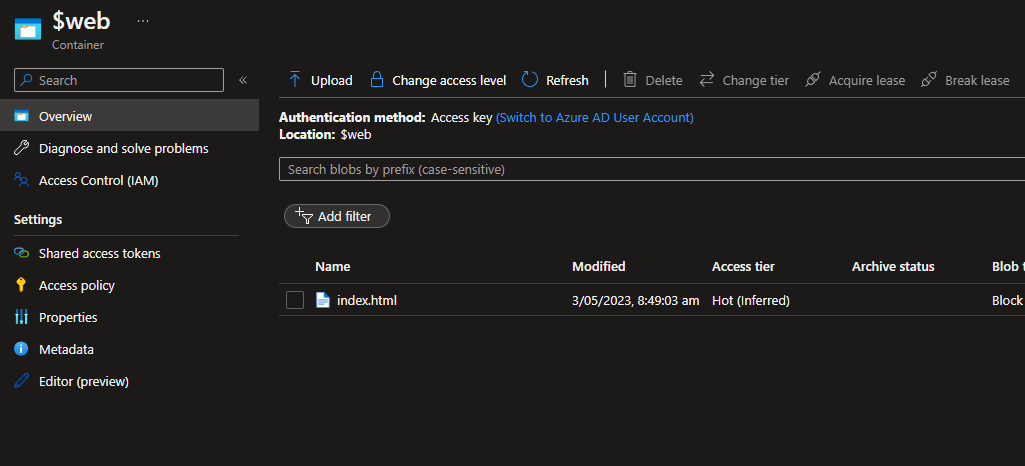
Once you have enabled the static website functionality, a new container named: $web will be created; this is the root of your static website – and where your HTML or static website will go.

After you upload your website files to the $web folder.

Azure Storage Account - $web container

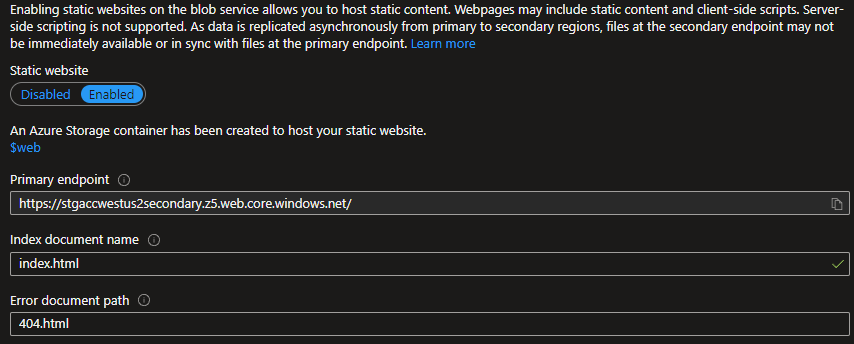
Add the index document name (i.e., index.html) and click Save.

Azure Storage Account - Static Website primary endpoint

If done correctly, your website should now show your website.Azure Storage account static websitev

If done incorrectly, you may get: The requested content does not exist.

The requested content does not exist

If this occurs, make sure:

  • There is no whitespace in the index document name.

Azure storage account - index.html

  • The Case matters, make sure if the filename is all lowercase in the container, then it’s all lowercase in the Azure storage account static website configuration.
  • Define a 404 page (the page that gets loaded) when attempting to browse paths that don’t match the index - make sure the site exists in a container and is added to the site storage account configuration, like the index document name.

404.html

  • If you don’t have a 404 page, you can have index.html as both.

Azure static web site - filenames

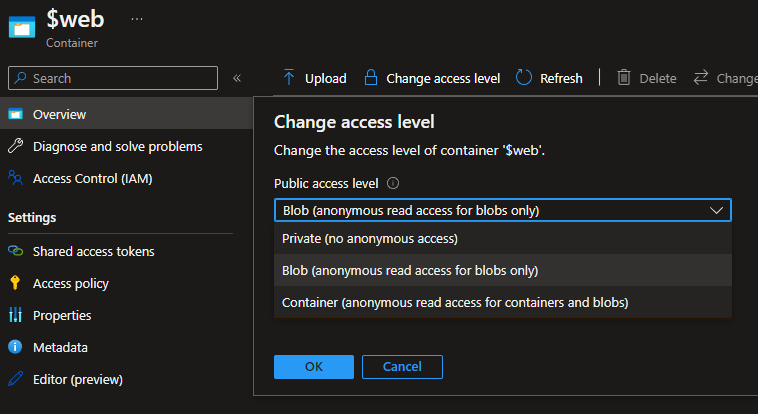
  • If you have a CDN (Content Delivery Network) in front of your Azure Storage account (Azure CDN, Cloudflare), you may need to adjust the access level of your Container from Private to: Blob (Anonymous). You shouldn’t have to adjust this usually, as the Access level controls the container endpoint access – not the static website endpoint.

Azure storage account - blob access level

Open multiple Microsoft Teams instances using PowerShell

· 2 min read

There may be circumstances, you need to open up multiple Microsoft Team instances, a reason for this - maybe to chat and join meetings across multiple accounts.

Microsoft are working on a version of Microsoft Teams that supports multiple-accounts, but until thats released - you can use a PowerShell script to open up another version of Microsoft Teams in another profile (or multiple, if you update the profilename).

This script also works within your LocalAppData, so you don't need local administrator rights to run.

# Uses the file name as the profile name
$MSTEAMS_PROFILE = 'CustomProfile'

Write-Host "- Using profile '$MSTEAMS_PROFILE'"

# Set the custom profile path
$USERPROFILE = Join-Path $env:LOCALAPPDATA "Microsoft\Teams\CustomProfiles\$MSTEAMS_PROFILE"

# Set the old user profile
$OLD_USERPROFILE = $env:USERPROFILE

# Launch MS Teams with the custom profile
Write-Host "- Launching MS Teams with profile '$MSTEAMS_PROFILE'"
Set-Location "$OLD_USERPROFILE\AppData\Local\Microsoft\Teams"

$teamsProcessStartInfo = New-Object System.Diagnostics.ProcessStartInfo
$teamsProcessStartInfo.FileName = "$OLD_USERPROFILE\AppData\Local\Microsoft\Teams\Update.exe"
$teamsProcessStartInfo.Arguments = "--processStart ""Teams.exe"""
$teamsProcessStartInfo.WorkingDirectory = "$OLD_USERPROFILE\AppData\Local\Microsoft\Teams"
$teamsProcessStartInfo.EnvironmentVariables["USERPROFILE"] = $USERPROFILE
$teamsProcessStartInfo.UseShellExecute = $false

[System.Diagnostics.Process]::Start($teamsProcessStartInfo) | Out-Null

# Set the user profile back to the old user profile
$env:USERPROFILE = $OLD_USERPROFILE

When the script is ran, a new profile will be created for Microsoft Teams, and then opened. You can then use that second Microsoft Teams instance, to connect to another account or tenancy.

To make it easier, you could also look at turning this script into an executable.

Failed to persist Terraform state using an Azure Blob Storage account

· 2 min read

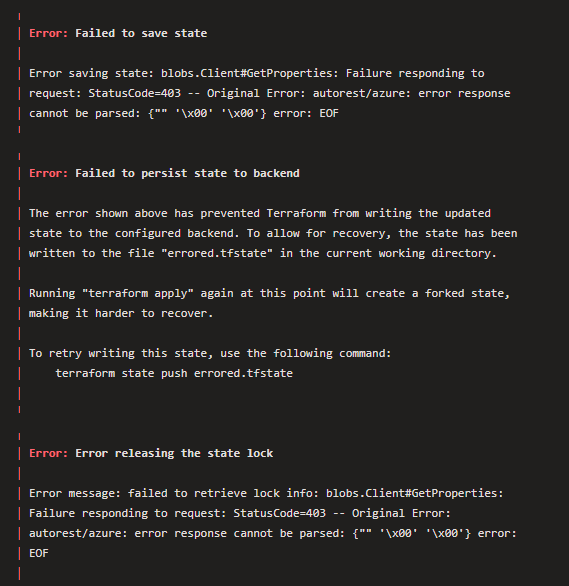
When attempting to make changes with Terraform, and the state changes are in an Azure storage account, you may come across: Failed to save state.

Error: Failed to save state

Error saving state: blobs:Clien#GetProperties: Failure responding to request: StatusCode=403 -- Original Error: autorest/azure: error response cannot be parsed: {"" '\x00' '\x00'} error: EOF

And: Error: Failed to persist state to backend.

Or Error: Error releasing the state lock.

Terraform - Failed to save state

Recently, encountered this issue when attempting a Terraform deployment; the state file kept locking midway through a deployment, this was traced to the Terraform storage account being in the Terraform code itself - with Public access set to Deny.

So the flow was looking like this: Script ran to allow Azure DevOps IP to the Storage account Firewall, then Terraform would start deploying and Deny access - preventing the state file from saving.

The first thing you need to do is break the lease on the state file.

  1. Navigate to your Azure Storage account that contains the state file
  2. Navigate to the Container that contains the state file
  3. Click on your state file and select Break lease
  4. Azure Storage account - break lease
  5. Once the lease is broken - make sure that your state file is 'Available' and not 'Leased'
  6. Then check your Terraform to make sure that it wasn't changing your Storage account that contained the Terraform state file in any way, then re-run your deployment.

Note: It may be wise, to make sure that the Azure storage account containing your state file is not managed by Terraform, to avoid unintentional mishaps.

Azure Quick Review

· 2 min read

There are a lot of workbooks that help with Microsoft Azure cost optimization, but when having discussions and looking into SLA/SLO and availability scenarios, there are fewer options to select from - today, we are going to look at the deployment and output of Azure Quick Review.

Azure Quick Review (azqr) goal is to produce a high level assessment of an Azure Subscription or Resource Group providing the following information for each Azure Service:

Azure Quick Review (created by Microsoft Senior Cloud Solution Architect Carlos Mendible), can supplement other tools - to give you visibility into your Azure services and answer questions such as:

  • What is my expected SLA?
  • Are my resources protected against zone failures?
  • Am I collecting diagnostic logs for my resources?
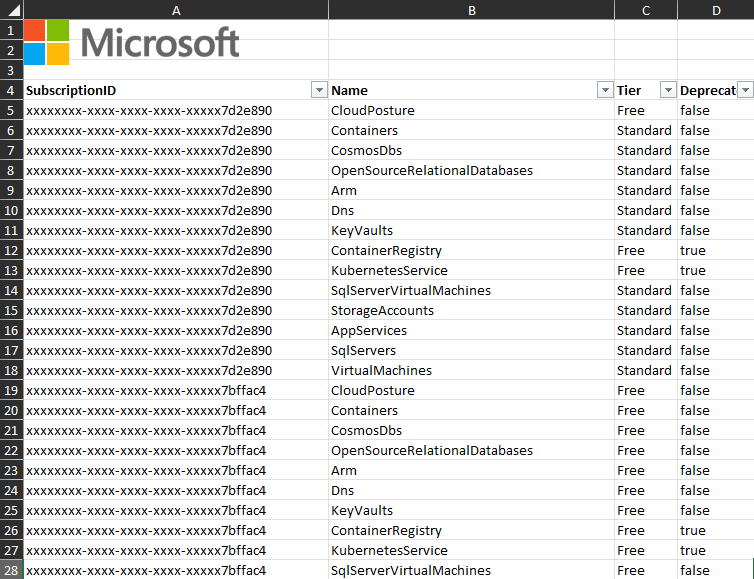
  • Is Defender for Cloud-enabled for all my resource types?

Using this tool is pretty simple (and, as the name suggests, Quick), and today we will look at running it from a windows endpoint, but first, we need some prerequisites.

Install the Azure CLI and make sure you have Reader rights across the subscriptions you want to review; in this demo, we will scan all subscriptions I have access to.

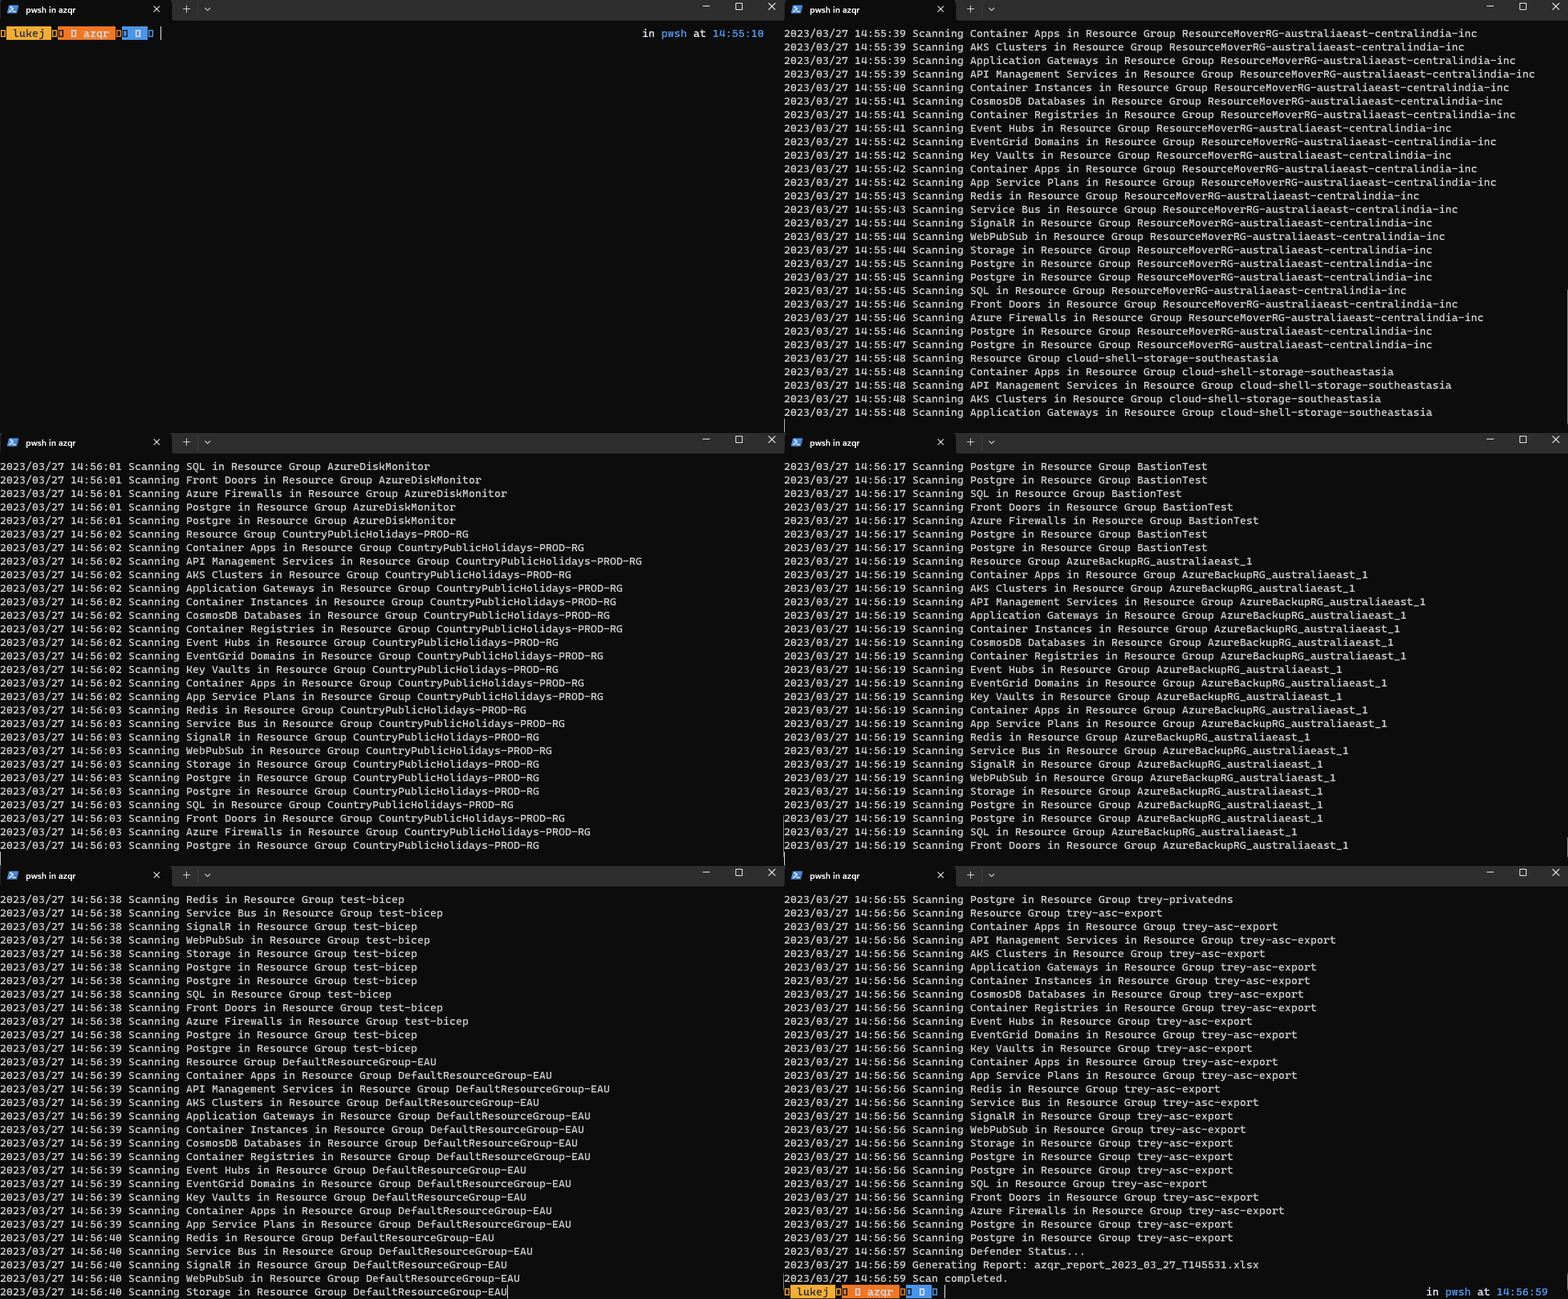
The Azure Quick Review (azqr) windows binary is intended to be run from the command line, so let's run it.

  1. Open your Windows Terminal

  2. Navigate to the location of the azqr binary

  3. Azure Quick Review

  4. Login to Azure using the Azure CLI by typing:

    az login
  5. Once you have authenticated, run the executable.

  6. Run azqr-windows-latest

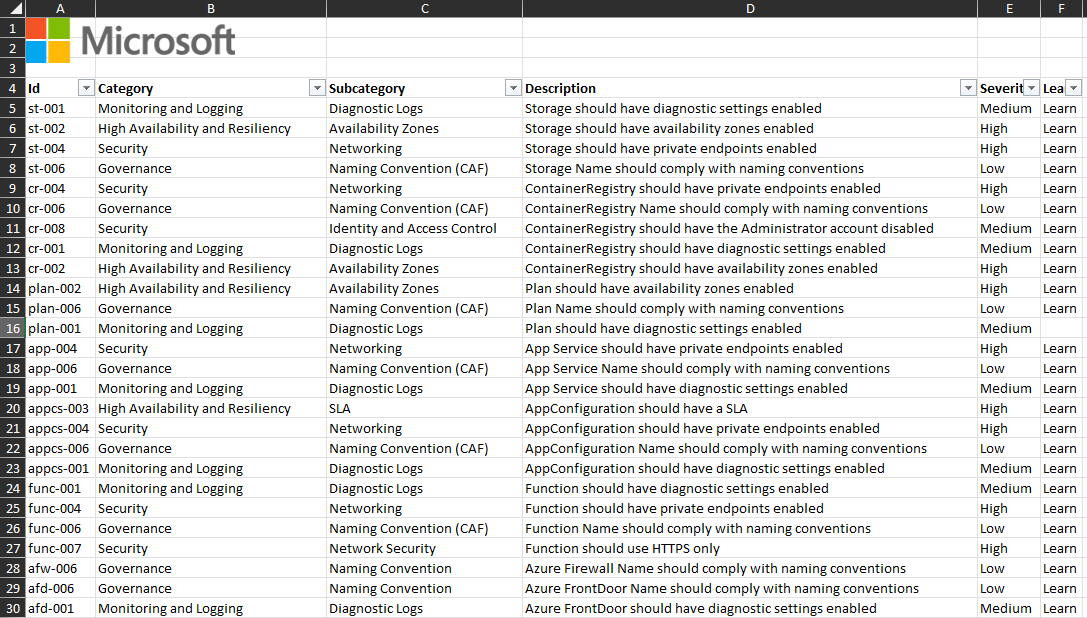
  7. Once it has been completed, there will be an excel spreadsheet in the same folder as the Azure Quick Review executable, with an output that contains something similar to the below:

  8. Azure Quick Review - Overview

  9. Azure Quick Review - Recommedations

  10. Azure Quick Review - Defender for Cloud