
You Can't Touch This: How to Make Your Azure Backup Immutable and Secure

· 5 min read

With immutable vaults, Azure Backup ensures that recovery points that are once created cannot be deleted before their intended expiry time. Azure Backup does this by preventing any operations which could lead to the loss of backup data.

Hence, this helps you protect your backups against ransomware attacks and malicious actors by disallowing operations such as deleting backups or reducing retention in backup policies.

Immutable vaults is now Generally available in all regions (March 13th 2023).

An immutable vault can assist in safeguarding your backup data by prohibiting any actions that might result in the loss of recovery points.

Can't touch this

By securing the immutable vault setting, it can be made irreversible, which can prevent any unauthorized individuals from disabling the immutability feature and erasing the backups.

The Immutable vault configuration supports both Recovery Services vaults and Backup vaults.

While Azure Backup stores data in isolation from production workloads, it allows performing management operations to help you manage your backups, including those operations that allow you to delete recovery points. However, in certain scenarios, you may want to make the backup data immutable by preventing any such operations that, if used by malicious actors, could lead to the loss of backups. The Immutable vault setting on your vault enables you to block such operations to ensure that your backup data is protected, even if any malicious actors try to delete them to affect the recoverability of data.

Enabling immutability for the vault is a reversible operation. However, you can make it irreversible to prevent any malicious actors from disabling it (after disabling it, they can perform destructive functions).

The type of operations enabling immutability on the Azure Backup vault can prevent and safeguard from is.

SystemOperation typeDescription
Recovery Services Vault & Backup VaultStop protection with delete dataA protected item can't have its recovery points deleted before their respective expiry date. However, you can still stop protection of the instances while retaining data forever or until their expiry.
Recovery Services VaultModify backup policy to reduce retentionAny actions that reduce the retention period in a backup policy are disallowed on Immutable vault. However, you can make policy changes that result in the increase of retention. You can also make changes to the schedule of a backup policy.
Recovery Services VaultChange backup policy to reduce retentionAny attempt to replace a backup policy associated with a backup item with another policy with retention lower than the existing one is blocked. However, you can replace a policy with the one that has higher retention.

There are three current states for the immutability of the Backup and Recovery Services Vault:

  • Disabled
  • Enabled (soft immutability)
  • Enabled and locked (hard immutability)
State of Immutable vault settingDescription
DisabledThe vault doesn't have immutability enabled and no operations are blocked.
EnabledThe vault has immutability enabled and doesn't allow operations that could result in loss of backups. However, the setting can be disabled.
Enabled and lockedThe vault has immutability enabled and doesn't allow operations that could result in loss of backups. As the Immutable vault setting is now locked, it can't be disabled. Note that immutability locking is irreversible, so ensure that you take a well-informed decision when opting to lock.

Immutable vaults and multi-user authorization can safeguard your backups from various human and technological accidents or disruptions.

Immutable vaults will not affect live or hot backups, such as snapshots.

Using the Azure Portal, let us configure immutability on your Azure Backup Vault.

  1. Navigate to your Recovery Services Vault
  2. Navigate to Properties (under Settings)
  3. Recovery Services Vault - Immutability
  4. Under Immutable vault, select Settings
  5. Click the box to enable vault immutability
  6. Enable vault immutability
  7. Click Apply
  8. The Recovery Services vault will be adjusted, and the status has changed to Enabled but not locked; this means that your vault is now immutable and won't allow operations that will result in the loss of backups; however, you can reverse the change by unticking vault immutability.
  9. Immutable vault - soft
  10. To hard lock, your vault, navigate back into the Immutable vault settings, toggle Locked, and Apply. This cannot be undone, so make this decision thought out, as it will stop the ability to reduce retention policies that will cause the deletion of recovery points, which could lead to increased costs in the longer term.

The Azure Backup vault immutability can also be adjusted using Azure Bicep, reference below.

param vaults_name string = 'rsv'

resource vaults_name_resource 'Microsoft.RecoveryServices/vaults@2022-09-10' = {
name: vaults_rsv_name
location: 'australiaeast'
sku: {
name: 'RS0'
tier: 'Standard'
}
properties: {
securitySettings: {
immutabilitySettings: {
state: 'Unlocked'
}
}
}
}

The immutabilitySettings states are:

StateActions
DisabledImmutability is Disabled
LockedEnabled but locked
UnlockedEnabled but unlocked

Note: I was able to delete a Recovery Vault, with locked Immutability successfully, that didn't have any Recovery points.

Export icons to SVG from the Microsoft Azure Portal using Amazing Icon Downloader

· 2 min read

Have you ever wanted to export an icon from the Microsoft Azure Portal but found yourself having to screenshot the icon at a low definition to include in your documentation or presentations?

Well - using the Amazing Icon Downloader browser plugin, you can export a single or all icons on a specific page in high definition as an SVG (Scalable Vector Graphics) file.

Easily view all icons on a page, works with:

  • portal.azure.com
  • endpoint.microsoft.com
  • Search to filter down long lists of icons
  • Rename and download any single icon
  • Bulk download all icons as a .zip file
  • Works with either Chrome or Edge

The plugin is available on Chrome or Edge browser stores and is intuitive.

Once you install it, it is a matter of browsing the page you want and clicking the extension to export.

Azure Icon Downloader

If you are after Visio stencils and other files, make sure you also check out David Summers Azure Stencil collection.

You may run into an issue where a new feature or icon is released, and the stencil collection hasn't been updated yet - which is where the Amazing Icon Downloader can come in handy.

Create Azure IP Groups based on the IP address ranges of countries

· 9 min read

An IP Group in Microsoft Azure is a logical container of IP address ranges for private and public addresses.

IP Groups allow you to group and manage IP addresses for Azure Firewall rules in the following ways:

  • As a source address in DNAT rules
  • As a source or destination address in network rules
  • As a source address in application rules

An IP Group can have a single IP address, multiple IP addresses, one or more IP address ranges or addresses and ranges in combination.

The IP Group allows you to define an IP address that can be used in conjunction with Azure Firewall, to allow or deny internal or external traffic from a perspective set of IP addresses.

The following IPv4 address format examples are valid to use in IP Groups:

  • Single address: 10.0.0.0
  • CIDR notation: 10.1.0.0/32
  • Address range: 10.2.0.0-10.2.0.31

By default, the Azure Firewall blocks outbound and inbound traffic; however, you may want to enable (or block) traffic to and from specific countries - there is no built-in geo-filtering with Azure Firewall, as you can use other services, such as the Web Application Gateway and with the Application Gateway and Azure Front Door to block and allow access, and other third party services such as Cloudflare. This script can be adapted for any list of IP ranges; it doesn't need to be country IP addresses.

However, you may want to control access to and from specific countries (or other services) with Azure Firewall - this is where the IP Groups can be effective, and because we won't be editing the Firewall directly - we won't run into issues with delays without having to wait for the Azure Firewall policies to be updated.

To solve the issue of creating the IP groups and finding and keeping the IP groups up-to-date with various countries' IP ranges - I have created a PowerShell function to retrieve supported countries' IP CIDR ranges and create the relevant IP groups.

Azure IP Group - Country IP ranges

With IP Groups, there are a few things to keep in mind:

  • You can have 200 IP Groups per firewall with a maximum of 5000 individual IP addresses or prefixes per each IP Group.

For a country like New Zealand, the 5000 limit for the address ranges is acceptable - but for other countries, like the United States or United Kingdom, this can be an issue, where the total IP ranges can grow to over 20k - to deal with this, the script will create multiple IP Groups, and append a number to the end.

Suppose IPs are manually added to the groups. In that case, they won't be added - the script will add in any different or new IP ranges, ignoring any current IP ranges (this means it won't delete any IP ranges that are removed from the source IP list from IPDeny); however, I recommend that anything added outside of this script is kept in a separate IP group.

As with any script, I recommend this is tested in a test environment first.

Before we run it, we need a few prerequisites.

The function assumes you have connected to Microsoft Azure and your relevant subscription.

Before we import the function, I am going to check if any IP groups already exist quickly (this isn't required) - but it's a good opportunity to check that you are connected to your Azure subscription and that the AzIPGroup cmdlets exist - and whether you have any IP groups already existing.

Get-AzIpGroup

Get-AzIpGroup

I have received no errors or existing IP groups in my subscription, so I will continue importing my function.

The function can be found here:

New-AzCountryIPGroup.p1
function New-AzCountryIPGroup {
<#
.SYNOPSIS
Creates an Azure IP group, with the IP address ranges for various countrues.
The code does the following:
1. It downloads the IP address ranges for the country specified.
2. It checks if the IP Group already exists, if it does, it adds the IP addresses to the existing IP Group.
3. If the total number of IP addresses is less than 5000, it will add the IP addresses to the existing IP Group.
4. If the total number of IP addresses is over 5000, it will create a new IP Group, with the same name as the existing IP Group, and it will add the IP addresses to the new IP Group.
5. If the new IP Group is over 5000, it will create a new IP Group, with the same name as the existing IP Group, and it will add the IP addresses to the new IP Group.
6. It will continue to create new IP Groups until all of the IP addresses are added.

The code can be used to create IP Groups for multiple countries, and if the number of IP addresses is over 5000, it will create multiple IP Groups, with the same name, but with a counter after the name, so that it will be unique.
.EXAMPLE
New-AzCountryIPGroup
New-AzCountryIPGroup -CountryCode NZ -IPGroupName IP -IPGroupRGName NetworkRG -IPGroupLocation AustraliaEast
.AUTHOR
Luke Murray - https://luke.geek.nz/

#>
[CmdletBinding()]
param
(
[Parameter(Mandatory = $true, Position = 0)]
[System.String]
$CountryCode,
[Parameter(Mandatory = $true, Position = 1)]
[Object]
$IPGroupName,
[Parameter(Mandatory = $true, Position = 2)]
[System.String]
$IPGroupRGName,
[Parameter(Mandatory = $true, Position = 3)]
[System.String]
$IPGroupLocation
)


$IPBlocks = Invoke-WebRequest -Uri ('https://www.ipdeny.com/ipblocks/data/aggregated/{0}-aggregated.zone' -f $CountryCode.ToLower())
#Exports the IPBlock content from the HTML request, into a String
$IPBlock = $IPBlocks.Content
#Spilts each IP block, into a seperate object
$ipaddressranges = $IPBlock -split '\s+' -replace '\r?\n\r?', '' | Where-Object { $_ -ne '' }

$Group = Get-AzIpGroup -Name $IPGroupName -ResourceGroupName $IPGroupRGName

if ($ipaddressranges.Length -lt 5000) {

If ($null -eq $Group) {
Write-Host "Group doesn't exist, creating a new IP Group called $IPGroupName in the following Azure Resource Group $IPGroupRGName and location $IPGroupLocation"
$Group = New-AzIpGroup -Name $IPGroupName -ResourceGroupName $IPGroupRGName -Location $IPGroupLocation -Tag @{Country = $CountryCode } -Verbose

If ($null -eq $Group) {
New-AzResourceGroup -Name $IPGroupRGName -Location $IPGroupLocation -Tag @{Country = $CountryCode }
$Group = New-AzIpGroup -Name $IPGroupName -ResourceGroupName $IPGroupRGName -Location $IPGroupLocation -Tag @{Country = $CountryCode } -Verbose

}

ForEach ($ip in $ipaddressranges) {
$Group.IpAddresses.Add($ip)
Write-Host "Adding $ip to $IPGroupName."
}

$Group | Set-AzIPGroup -Verbose

}

else {
Write-Host "Group already exists called:$IPGroupName in the following Azure Resource Group $IPGroupRGName and location $IPGroupLocation. Adding IPs to the group... Please note that this script doesn't check already existing IP addresses, if identical IP addresses exist, it will overrite it, if IP addresses outside of the Country List exist, it will remain in the IP Group - but there is no checking, if there is pre-equisting IP addresses in the IP Group that will raise the Group Limit above 5000. I recommend keeping the Country IP group seperate."
$Group = Get-AzIpGroup -Name $IPGroupName -ResourceGroupName $IPGroupRGName


ForEach ($ip in $ipaddressranges) {
$Group.IpAddresses.Add($ip)
Write-Host "Adding $ip to $IPGroupName"
}

$Group | Set-AzIPGroup -Verbose
}
}

else {

Write-Host "Azure IP Groups only support IPAddresses of up-to 5000 (the country you have specified is: "$ipaddressranges.Length"), also please make sure the country code matches https://www.ipdeny.com/ipblocks/data/aggregated/"

$counter = [pscustomobject] @{ Value = 0 }
$groupSize = 5000
$groups = $ipaddressranges | Group-Object -Property { [math]::Floor($counter.Value++ / $groupSize) }
$counter = 0
ForEach ($group in $groups) {
$countup = $counter + 1

$azipgroup = Get-AzIpGroup -Name "$IPGroupName$countup" -ResourceGroupName $IPGroupRGName -Verbose


If ($null -eq $azipgroup) {
$countup = $counter + 1
Write-Host "$IPGroupName$countup doesn't exist. Creating... $IPGroupName$countup in the following Resource Group $IPGroupRGName and location $IPGroupLocation."
$azipgroup = New-AzIpGroup -Name "$IPGroupName$countup" -ResourceGroupName $IPGroupRGName -Location $IPGroupLocation -Tag @{Country = $CountryCode } -Verbose -Force
$ipgroup = $group.Group
ForEach ($IP in $ipgroup) {
$azipgroup.IpAddresses.Add($IP)
Write-Host "Adding $ip to $IPGroupName"
}

$azipgroup | Set-AzIPGroup -Verbose
$counter++

}
else {
$ipgroup = $group.Group
ForEach ($IP in $ipgroup) {
$azipgroup.IpAddresses.Add($IP)
Write-Host "Adding $ip to $IPGroupName"
}

$azipgroup | Set-AzIPGroup -Verbose
$counter++
}
}

}
}

Note: Make sure your country matches the supported country shortcodes found here: IPBlock Aggregated. IPDeny is the source for the IP address list.

Once saved to your computer, it's time to import it into your active PowerShell terminal and run it (after you have verified you have connected to the correct Azure subscription).

So I will navigate to the script and import it:

cd D:\git
. .\New-AzCountryIPGroup.ps1
New-AzCountryIPGroup

Import New-AzCountryIPGroup.ps1

The 'New-AzCountryIPGroup' Azure function relies on 4 parameters:

ParametersValues
CountryCodeNZ
IPGroupNameIPGrpNZ
IPGroupRGNameNetworkRG
IPGroupLocationAustraliaEast

Make sure that the values change to your environment; in my example, I am specifying an IP Group and Resource Group that doesn't exist so that the script will create it for me - and the location I will be deploying to will be the Australia East region.

New-AzCountryIPGroup -CountryCode NZ -IPGroupName IPGrpNZ -IPGroupRGName NetworkRG -IPGroupLocation AustraliaEast

New-AzCountryIPGroup

As you can see, the script created an Azure Resource Group and imported the New Zealand IP ranges to a new IP Group...

Not required - but if I rerun it, it will simply override any IP addresses that are the same and add any new addresses to the same IP Group that already exists, as below:

Rerun New-AzCountryIPGroup

The Azure IP Group is visible in the Azure Portal as below:

Azure Portal - Azure IP Group

And a Tag was added to include the country:

Azure IP Group - Tag

As New Zealand was under the 5000 limit, only one IP Group was needed, but if we change the Country Code to the US...

Run New-AzCountryIPGroup - US

It created 5 IP groups, each containing 5000 CIDR IP ranges, with the last containing the remaining IP address ranges.

As you can see, it's reasonably easy to create IP Groups containing a list of IP ranges for multiple countries quickly:

Azure Portal - Azure IP Groups

Note: The script can also be found in my Public Git Repo here, feel free to recommend pull requests if you have anything to add or change.

Microsoft Dev Box wrapped in a bow

· 17 min read

Festive Tech Calender - Microsoft Dev Box

It's that time of year again! The time to be jolly and experience the Month of December by looking at the Festive Tech Calendar!

This year the Festive Tech Calendar Team is raising money for the charity @missingpeople.

We believe its important to support charities that do great work. Without fundraising Missing People wouldn’t be able to find vulnerable missing people and reunite families.

If you would like to donate please visit our Just Giving Page

Today, we sent our present and took a peek inside the box - at Microsoft Dev Box!

Overview

Microsoft Dev Box provides self-service access for developers to high-performance, cloud-based workstations preconfigured and ready-to-code for specific projects - all while maintaining security and corporate governance. With Microsoft Dev Box, organizations can:

  • Maximize dev productivity with ready-to-code, self-service Dev Boxes.
  • Central management of workstations running anywhere to maintain greater security, compliance, and cost efficiency.
  • Customize dev boxes with everything developers need for their current projects.

Microsoft Dev Box supports any developer IDE, SDK, or tool that runs on Windows. Developers can target any development workload built from Windows, including desktop, mobile, IoT, and web applications. Microsoft Dev Box even supports building cross-platform apps thanks to Windows Subsystem for Linux and Windows Subsystem for Android. Remote access allows developers to securely access dev boxes from any device, whether it's Windows, macOS, Android, iOS, or a web browser.

High-level Azure Devbox workflow

Microsoft Dev Box is a managed service that enables developers to create on-demand, high-performance, secure, ready-to-code, project-specific workstations in the cloud.

Microsoft Dev Box is available today as a preview from the Azure Portal. During this period, organizations get the first 15 hours of the dev box 8vCPU and 32 GB Memory SKU for free every month, along with the first 365 hours of the dev box Storage SSD 512 GB SKU.

Beyond that, organizations pay only for what they use with a consumption-based pricing model. With this model, organizations are charged per hour depending on the number of Compute and Storage consumed.

To use Microsoft Dev Box, each user must be licensed for Windows 11 or 10 Enterprise, Microsoft Endpoint Manager, and Microsoft Entra ID P1. These licenses are included in M365 F3, E3, E5, A3, A5, Microsoft Business Premium and Microsoft 365 Education benefit plans.

Microsoft Dev Box

Disclaimer: At the time of writing, this service is still in Public Preview, some services and license requirements may change by the time this becomes generally avaliable.

So, where does Microsoft Dev Box fit in?

Microsoft offers a plethora of services, from Azure Virtual Desktop, Windows 365, and now Microsoft Dev Box - where would you use Microsoft Dev Box over another service, such as Windows 365?

General scenarios at a high level are:

ScenarioProduct
Production multi-session, supporting Windows Server and Client OS, Published ApsAzure Virtual Desktop
Production dedicated personal PCs, for shift/party time users - or small environmentsWindows 365
Dev/Test Ondemand Windows machines for Testing and development with custom image supportAzure Dev Box

Microsot Windows Experiances Strategy

Microsoft Dev box can help project and development teams get up and running quickly, independent of what hardware a developer or contractor has, whether they prefer Mac, Windows, or Linux - the Microsoft Dev box can be used to get developers and contractors up and running in a secure environment that supports Intune!

Concepts & Roles
ConceptsNotes
Dev centerA dev center is a collection of projects that require similar settings. Dev centers enable dev infrastructure managers to manage the images and SKUs available to the projects using dev box definitions and configure the networks the development teams consume using network connections.
ProjectsA project is the point of access for the development team members. When you associate a project with a dev center, all the settings at the dev center level will be applied to the project automatically. Each project can be associated with only one dev center.
Dev box definitionA dev box definition specifies a source image and size, including compute size and storage size. You can use a source image from the marketplace, or a custom image.
Network connectionNetwork connections store configuration information like Active Directory join type and virtual network that dev boxes use to connect to network resources.
Dev box poolA dev box pool is a collection of dev boxes that you manage together and to which you apply similar settings.
Dev boxA dev box is a preconfigured ready-to-code workstation that you create through the self-service developer portal. The new dev box has all the tools, binaries, and configuration required for a dev box user to be productive immediately

DevBoxHierarchy

The following are typical Azure Dev Box roles.

RoleResponsibilitiesPermissions
Dev Infra AdminsProviding developer infrastructure and tools to the development teasCan create and manage dev centers, can create projects and define images that are used to create the dev boxes
Project AdminsDoes administrative tasks for the Dev Box solution and assist with day to day tasks.Can create and manage dev box pools across different regions
Dev Box UsersMembers of your development teamsCan self-service and create one or more dev boxes, depending on the projects assigned.

Deployment

Create Dev Center

First, we need to create our Dev Center. A Dev Center allows us to centrally manage our developer environments and enable development teams with self-service capability. Dev Center is used by more than just Microsoft DevBox - an example is Azure Deployment Environments - which allows devs to spin up templated (ARM) application infrastructure quickly - but we will focus on components of Dev Center - used by Microsoft Dev Box.

Please confirm what region you can deploy Dev Box. As this is in Public Preview at the time of writing - only certain regions are supported.

Let's create a standard Dev Box environment in your favourite browser, starting with the Dev Center...

  1. Log in to the Microsoft Azure Portal
  2. Click + Create a resource
  3. Search for: Dev center, select your Dev center and click Create
  4. Microsoft Azure Portal - Dev center
  5. Select the Subscription and ResourceGroup you want to deploy your Dev Center; you can use this opportunity to create a new Resource Group.
  6. Type in the name__ of your DevCenter **(in my example, it is named DevCenter-Devs)
  7. Then select the location (region) in which you want to deploy your DevCenter.
  8. Azure Portal - Create a dev center
  9. Click Review + Create, then Create

Deployment of the Microsoft Dev Center will take a few minutes.

Create Virtual Network

To use Microsoft Dev Boxes - like any Virtual Machine in Azure, you need a Virtual Network! The Dev Boxes can connect to existing Virtual Networks, which could be peered with other VNETs, have connectivity to on-premises - or have standalone secure connectivity through network links! In my demo, I don't currently have a Virtual Network - so I will create a Virtual Network from scratch.

  1. Log in to the Microsoft Azure Portal
  2. Click + Create a resource
  3. Search for: Virtual Network
  4. Create a Virtual Network
  5. Select your Virtual Network name and region (make sure the region aligns with your workloads and Azure DevCenter location)
  6. Azure Portal - Create VNET
  7. Click Next: IP Addresses
  8. I will leave the IP address space the default of 10.1.0.0/16 - but change the default subnet name to devbox-subnet.
  9. Azure Portal - Create VNET
  10. Click Review + create
  11. Click Create

Now that we have our Dev Center and our Virtual Network - it's time to make a Network connection - this connection will be used by Dev Center - to allow our Dev Boxes to connect to the Virtual Network - and to select your Virtual Machine identification (i.e. Microsoft Entra ID, or Hybrid Microsoft Entra ID).

  1. Log in to the Microsoft Azure Portal
  2. Click + Create a resource.
  3. Type in: Network Connection, find and click Create
  4. Create Network Connection
  5. As I will be using Microsoft Entra ID joined Virtual Machines, I will ensure that the Domain join type is: Microsoft Entra ID join.
  6. For the Network connection name, I will select: ProductionVNETAADJConnection
  7. I will select my Virtual Network and subnet, which the Dev Box will be placed into.
  8. Create Azure Network Connection
  9. Click Review + Create, and click Create
  10. Now that we have created the Network connection - it is time to link it to our Dev Center - so it can be used.
  11. Navigate to your Dev Center
  12. Under Dev Box configuration, select Networking
  13. Click + Add
  14. Select your Network connection that has just been created
  15. Azure Dev Center - Link Network Connection
  16. Click Add
  17. The Network Connection will check all the network requirements for the Dev Box service, such as the Azure tenant and Intune configuration (i.e. is there a restriction in Endpoint Management for Windows).
Create Dev box definitions

It's time to create our Dev box definition. The Dev box definition is the type of Virtual Machines -or Dev Boxes that are standard for your environment. A dev box definition will be used to define the image (whether a custom or marketplace image), SKU of virtual machines (Compute + Memory), and available storage. Note that if you want to use a Custom Image - you will need an Azure Compute gallery, and if you decide to go down this route, make sure you check out Azure VM Image Builder to help automate and build your images. You can have multiple definitions per project.

  1. Log in to the Microsoft Azure Portal
  2. Navigate to your Dev center
  3. Navigate to Dev box definitions
  4. Click + Create
  5. For our Image definition name, I will go with Win11-VS
  6. For Images, there are a plethora of images available! For this guide, I will use Visual Studio 2019 Enterprise on Windows 11 Enterprise + Microsoft 365 Apps 22H2 image.
  7. Azure Dev Box definitions
  8. I will select the Latest image version and specify 4vCPU, 16GB of RAM, and a 256 GB SSD drive.
  9. Azure Dev Box definitions
  10. Click Create

You can edit a Dev box definition, change the image, Compute, and storage after it has been created; this could be useful if there are issues with the latest version of the image, you can roll back the version - so people can make their Dev Boxes while the image is worked on.

Create and assign Project

Now that we have our Dev Center and Virtual Network connection - it is time to create a Project. A Project is intended to be task specific - an example being the following user story "As a developer working on a mobile game, I need access to a Windows 11 Development workstation with Visual Studio installed" - so all users working on that mobile game - will get an identical virtual machine setup with all the pre-requisites that the need to start development, a project team working on another mobile game, may need different software or dependencies - so will be part of another project.

  1. Log in to the Microsoft Azure Portal
  2. Navigate to your Dev center
  3. Navigate to Projects
  4. Select + Create
  5. Select your Resource Group
  6. Select your Dev center
  7. Please type in the name of our Project and enter a description.
  8. Azure DevBox - Create Project
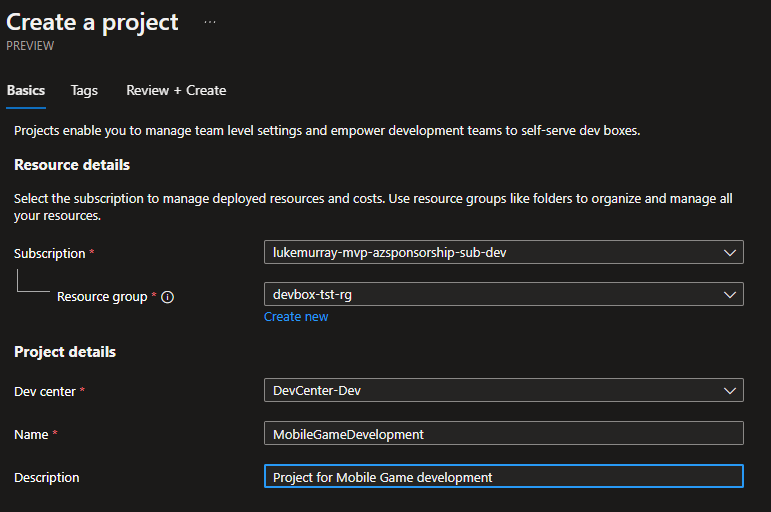
  9. You can use Tags to add additional information on billing for the project or the project administrator's contact details - but we will select Review + create and Create
  10. Once the Project has been created, we need to assign assignees to use the project. I will give a DevBox User role to the project so I can make a Dev Box.
  11. Within the Project, click on the Access Control (IAM)
  12. Click + Add
  13. Select Add Role assignment
  14. Select DevCenter Dev Box User
  15. Click Next
  16. Make sure User, Group, or Service principal is selected and click + Select Members.
  17. Ideally, you would assign the Dev Box User role to an Azure AD group - but in my demo, I will select an individual user.
  18. Click Next
  19. Azure Dev Box - Assign Project Members
  20. Once you have confirmed your users have been assigned, click on Review + assign to give your users or groups to the project, allowing them to create Dev Boxes.

Note: I have found it can take 5-10 minutes for access to be granted to the users before they can create Dev Boxes.

Create Dev Box Pool

Now that we have our project and dev box definitions - it's time to create our Dev Box Pool - which is what the Dev Boxes will be made from.

  1. Log in to the Microsoft Azure Portal
  2. Navigate to your Dev center
  3. Navigate to Projects
  4. Navigate to the project you created earlier (i.e. for me, its MobileGameDevelopment)
  5. Click on the Dev box pools
  6. Click on + Create
  7. Azure Dev Box - Create Dev Box Pools
  8. Type in a name - i.e. MobleDevelopmentWin11
  9. Select your Network connection
  10. Select your definition
  11. Select your Creator privileges (i.e. select whether your user will be a standard user or have Local administrator rights on their devbox)
  12. Configure Auto-stop or skip and confirm licensing.
  13. Click Create

After 1-2 minutes, your Dev Box pool has been created.

Create & Connect

Now that your Dev Center, Network, and Dev Box project has been stood up - it's time to Create and connect to your new Dev box! Microsoft Dev Box - offers a few ways to connect to the DevBox; we will go through a few options now.

Create Dev Box

Now it's time to create our Dev Box! To do this, we need to go to the Dev box Developer portal (as a Dev Center Devbox, User)

  1. Navigate to the Microsoft Dev Box portal
  2. Click on + New Dev Box
  3. Enter your name of the DevBox (i.e. what you will name the Virtual Machine and see in the portal - make sure this is meaningful - as you may have more than one Dev Box)
  4. Select your assigned Dev Box Pool, and select your Dev Box definition
  5. Microsoft Dev Box - Create Virtual Machine
  6. Click Create
  7. DevBox - Creating

Note: Dev box creation can take 30-90 minutes. Dev boxes will automatically start upon creation.

Connect Dev Box using Microsoft Dev Box Portal
  1. Navigate to the Microsoft Dev Box portal
  2. Click on the Dev Box you want to connect to.
  3. Select Open in the browser
  4. Azure DevBox - HTML Client
  5. Azure Dev Box /Windows 365 Connection
  6. If prompted, then log in with your credentials.
  7. Azure Dev Box - Sign In
  8. You will now be connected to your new Azure Dev Box!
  9. Azure Dev Box
Connect Dev Box using Remote Desktop Application

Like Azure Virtual Desktop, you can connect to your Dev Box using the Remote Desktop client.

  1. Download and install the Remote Desktop Client
  2. Subscribe to the Azure workspace
  3. As long as the Dev Box has been created, you can see your Dev Box and connect to it directly.
  4. Remote Desktop Client - Microsoft Dev Box

Configuration

We can configure a few extra things for the Azure DevBox environment.

Auto-Stop

As the Dev Box is Pay As You Go, you can ensure that a Dev Box is shut down after hours.

  1. Log in to the Microsoft Azure Portal
  2. Navigate to your Dev center
  3. Navigate to Projects
  4. Navigate to the project you created earlier (i.e. for me, its MobileGameDevelopment)
  5. Click on the Dev box pools
  6. Click on Edit on your pools
  7. Click Enable Auto-stop
  8. Select Yes
  9. Configure your Stop Time and time zone

You may also have multiple pools - selected with the exact Dev box image definition - if your project runs across various timezones, so you can schedule a 7 PM Shutdown in New Zealand and a 7 PM shutdown for those developers in the United States.

Delete or Stop

Not as much as a Configuration item, but more of a quick - howto! As a Dev Box user, you can shut down your Dev Box or delete it from the Microsoft Dev Box portal.

Azure Dev Box - Stop or Delete

Additional Resources

As Microsoft Dev Box is still in Public Preview - at the time of writing - the experience may change before its GA (Generally available).

Documentation

Additional reading on Microsoft Dev Box can be found below:

Azure Bicep

Below are some Azure Bicep samples for Azure Dev Box.

Dev Center
param name string
param location string
param tags object

resource name_resource 'Microsoft.DevCenter/devcenters@2022-08-01-preview' = {
name: name
location: location
tags: tags
identity: {
type: 'none'
}
}
DevBox Host Pool
param projects_MobileGameDevelopment_name string = 'MobileGameDevelopment'

resource projects_MobileGameDevelopment_name_MobleDevelopmentWin10Secure 'Microsoft.DevCenter/projects/pools@2022-09-01-preview' = {
name: '${projects_MobileGameDevelopment_name}/MobleDevelopmentWin10Secure'
location: 'australiaeast'
properties: {
devBoxDefinitionName: 'Win10-VS'
networkConnectionName: 'ProductionVNETAADJConnection'
licenseType: 'Windows_Client'
localAdministrator: 'Disabled'
}
}

resource projects_MobileGameDevelopment_name_MobleDevelopmentWin10Secure_default 'Microsoft.DevCenter/projects/pools/schedules@2022-09-01-preview' = {
parent: projects_MobileGameDevelopment_name_MobleDevelopmentWin10Secure
name: 'default'
properties: {
type: 'StopDevBox'
frequency: 'Daily'
time: '11:15'
timeZone: 'Pacific/Auckland'
state: 'Enabled'
}
}

Hosting your workloads in Azure vs On-premises

· 4 min read

Azure is a cloud computing platform that provides a wide range of services and capabilities for building and deploying applications and workloads in the cloud. In contrast, hosting your own datacenter involves setting up and managing a physical infrastructure, including servers, storage, networking, and other components, in a location controlled by the organization.

Azure and hosting your own datacenter are two different approaches for deploying and managing applications and workloads.

There are several key differences between Azure and hosting your own datacenter, including the following:

  • Capital expenditure and operational costs: Azure is a pay-as-you-go service, with no upfront costs or long-term commitments, while hosting your own datacenter involves a significant capital expenditure, and ongoing costs for maintenance, support, and infrastructure upgrades.
  • Scalability and elasticity: Azure provides automatic scalability and elasticity, with the ability to scale up and down on demand, and pay only for the resources that are used, while hosting your own datacenter requires manual scaling and capacity planning, and may result in underutilized or overutilized resources.
  • Security and compliance: Azure provides built-in security and compliance features, with the ability to deploy and manage applications and workloads in a secure and compliant manner, while hosting your own datacenter requires the implementation and maintenance of security and compliance controls, and may expose the organization to security and compliance risks.
  • Integration and interoperability: Azure integrates well with other Azure services and technologies, as well as with on-premises environments, while hosting your own datacenter may require the use of complex integration and interoperability solutions, and may result in vendor lock-in and interoperability challenges.

Overall, Azure and hosting your own datacenter are two different approaches, with different advantages and disadvantages. Azure can provide a more cost-effective, scalable, and secure solution, but may require the adoption of a different operating model and a learning curve, while hosting your own datacenter can provide more control and flexibility, but may require a larger investment and ongoing operational costs.

The total cost of ownership (TCO) of Azure and on-premises can vary depending on several factors, including the specific services and resources that are used, the usage patterns and workloads, the pricing options and discounts, and the cost optimization strategies and techniques that are implemented.

In general, the TCO of Azure can be lower than the TCO of on-premises, for the following reasons:

  • Azure provides a pay-as-you-go pricing model, with no upfront costs or long-term commitments, and the ability to scale up and down on demand, and pay only for the resources that are used. This can help to reduce the overall TCO, compared to the upfront capital expenditure and ongoing operational costs of on-premises infrastructure.
  • Azure provides built-in support and maintenance services, as part of the subscription fees, and the ability to choose from different support and maintenance plans, depending on the specific needs and requirements of the organization. This can help to reduce the TCO, compared to the costs of hiring and maintaining a dedicated IT staff for on-premises infrastructure.
  • Azure provides built-in security and compliance features, and the ability to deploy and manage applications and workloads in a secure and compliant manner. This can help to reduce the TCO, compared to the costs of implementing and maintaining security and compliance controls for on-premises infrastructure.

Overall, the TCO of Azure can be lower than the TCO of on-premises, due to the pay-as-you-go pricing model, the built-in support and maintenance services, and the built-in security and compliance features. However, the actual TCO may vary depending on the specific needs and requirements of the organization, and on the implementation and cost optimization strategies that are used.