Bring Your Data to Life with Azure OpenAI
Today, we will look at using Azure OpenAI and 'Bring Your Data' to allow recent documentation to be referenced and bring life (and relevance) to your data.

The example we are going to use today is the Microsoft Learn documentation for Microsoft Azure.
Our scenario is this:
- We would like to use ChatGPT functionality to query up-to-date information on Microsoft Azure; in this example, we will look for information on Azure Elastic SAN (which was added in late 2022).
When querying ChatGPT for Azure Elastic SAN, we get the following:
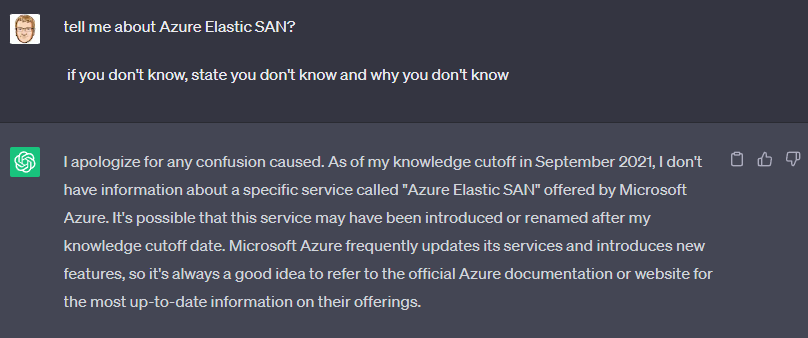
Just like the prompt states, ChatGPT only has data up to September 2021 and isn't aware of Elastic SAN (or any other changes/updates or new (or retired) services after this date).
So let us use the Azure OpenAI and bring in outside data (ground data), in this case, the Azure document library, to overlay on top of the GPT models, giving the illusion the model is aware of the data.
To do this, we will leverage native 'Bring Your Own Data' functionality, now in Azure OpenAI - this is in Public Preview as of 04/07/2023.
To be clear, I don't expect you to start downloading from GitHub; this is just an example I have used to add your data. The ability to bring in updated data on Azure, specifically, will be solved by Plugins, such as Bing Search.
To do this, we will need to provision a few Microsoft Azure services, such as:
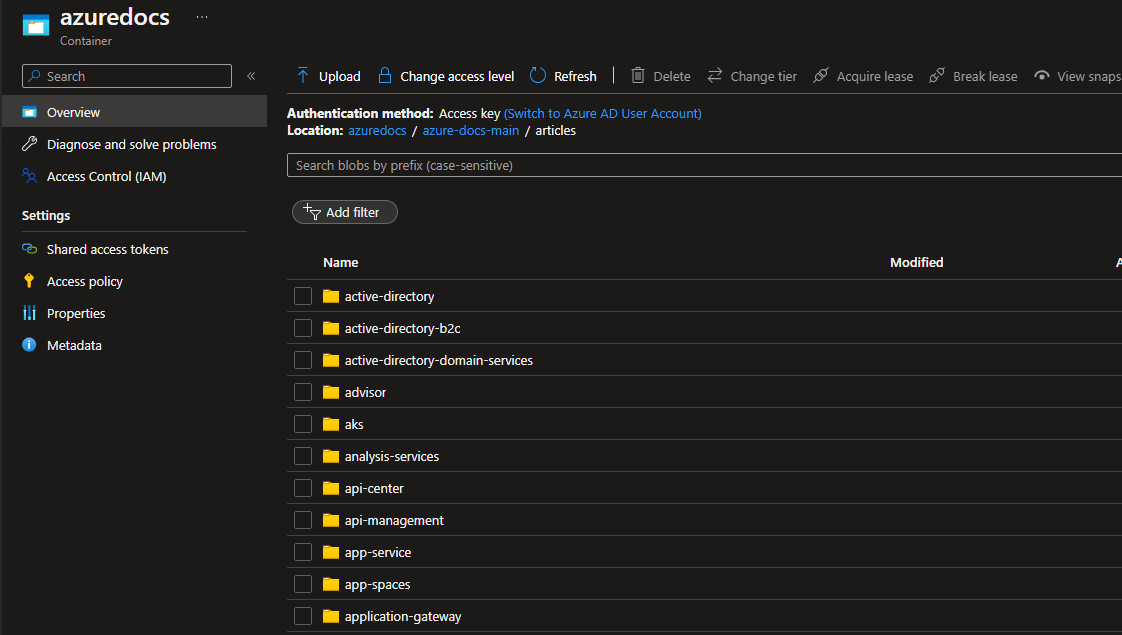
- Azure Storage Account (this will hold the Azure document library (markdown files) in a blob container)
- Cognitive Search (this search functionality, is the glue that will hold this solution together, by breaking down and indexing the documents in the Azure blob store)
- Azure OpenAI (to do this, we will need GPT3.5 turbo or GPT4 models deployed)
- Optional - Azure Web App (this can be created by the Azure OpenAI service, to give users access to your custom data)
Make sure you have Azure OpenAI approved for your subscription
We will use the following tools to provision and configure our services:
- Azure Portal
- PowerShell (Az Modules)
- AzCopy
Download Azure Documents
First, we will need the Azure documents to add to our blob storage.
The Microsoft Learn documentation is open-sourced and constantly updated using a git repository hosted on GitHub. We will download and extract the document repository locally (roughly 6 GB). To do this, we will use a PowerShell script:
     $gitRepoUrl = "https://github.com/MicrosoftDocs/azure-docs"
     $localPath = "C:\temp\azuredocs"
     $zipPath = "C:\temp\azurdocs.zip"
     #Download the Git repository and extract
     Invoke-WebRequest -Uri "$gitRepoUrl/archive/master.zip" -OutFile $zipPath
     Expand-Archive -Path $zipPath -DestinationPath $localPath
Create Azure Storage Account
Now that we have a copy of the Azure document repository, it's time to create an Azure Storage account to copy the data into. To create this storage account, we will use PowerShell.
     # Login to Azure
     Connect-AzAccount
     # Set variables
     $resourceGroupName = "azuredocs-ai-rg"
     $location = "eastus"
     $uniqueId = [guid]::NewGuid().ToString().Substring(0,4)
     $storageAccountName = "myaistgacc$uniqueId"
     $containerName = "azuredocs"
     # Create a new resource group
     New-AzResourceGroup -Name $resourceGroupName -Location $location
     # Create a new storage account
     New-AzStorageAccount -ResourceGroupName $resourceGroupName -Name $storageAccountName -Location $location -SkuName Standard_LRS -AllowBlobPublicAccess $false
     # Create a new blob container
     New-AzStorageContainer -Name $containerName -Context (New-AzStorageContext -StorageAccountName $storageAccountName -StorageAccountKey (Get-AzStorageAccountKey -ResourceGroupName $resourceGroupName -Name $storageAccountName).Value[0])
We have created our Resource Group and Storage account to hold our Azure documentation.
Upload Microsoft Learn documentation to an Azure blob container
Now that we have the Azure docs repo downloaded and extracted and an Azure Storage account to hold the documents, it's time to use AzCopy to copy the documentation to the Azure storage account. We will use PowerShell to create a SAS token (open for a day) and use that with AzCopy to copy the Azure repo into our newly created container.
     # Set variables
     $resourceGroupName = "azuredocs-ai-rg"
     $storageAccountName = "myaistgacc958b"
     $containerName = "azuredocs"
     $storageAccountKey = (Get-AzStorageAccountKey -ResourceGroupName $resourceGroupName -Name $storageAccountName).Value[0]
     $localPath = "C:\Temp\azuredocs\azure-docs-main"
     $azCopyPath = "C:\tools\azcopy_windows_amd64_10.19.0\AzCopy.exe"
     # Construct SAS URL for destination container
     $sasToken = (New-AzStorageContainerSASToken -Name $containerName -Context (New-AzStorageContext -StorageAccountName $storageAccountName -StorageAccountKey $storageAccountKey) -Permission rwdl -ExpiryTime (Get-Date).AddDays(1)).TrimStart("?")
     $destinationUrl = "https://$storageAccountName.blob.core.windows.net/$containerName/?$sasToken"
     # Run AzCopy command as command line
     $command = "& `"$azCopyPath`" copy `"$localPath`" `"$destinationUrl`" --recursive=true"
     Invoke-Expression $command
Note: I took roughly 6 minutes to copy the Azure docs repo from my local computer (in New Zealand) into a blob storage account in East US, so roughly a gigabyte a minute.
Create Cognitive Search
Now that we have our Azure Blob storage accounts, it's time to create our Cognitive Search. We will need to create a Cognitive Search, with an SKU of Standard, to support the 6GBs of Azure documents that must be indexed. Please check your costs; this is roughly NZ$377.96 a month to run; you can reduce this cost by limiting the amount of data you need to index (i.e., only certain documents, not an entire large repository of markdown files). Make sure you refer to the Pricing Calculator.
     # Set variables
     $resourceGroupName = "azuredocs-ai-rg"
     $searchServiceName = "azuredocssearchservice" #Cognitive Service name needs to be lowercase.
     # Create a search service
     Install-Module Az.Search
     $searchService = New-AzSearchService -ResourceGroupName $resourceGroupName -Name $searchServiceName -Location "eastus" -Sku Standard
Now that the cognitive search has been created, we need to create the index, and indexers, which will index our Azure documents to be used by Azure OpenAI by creating the index and linking it to the Azuredocs blob container, we created earlier.
Note: There is no PowerShell cmdlet support for Azure Cognitive Search indexes; you can create using the RestAPI - but we will do this in the Azure Portal as part of the next step.
Create Azure Cognitive Search Index
It's time to time to create the Cognitive Search Index, an indexer that will index the content.
We will move away from PowerShell and into the Microsoft Azure Portal to do this.
- Navigate to the Microsoft Azure Portal
- In the top center search bar, type in Cognitive Search
- Click on Cognitive Search
- Click on your newly created Cognitive Search

- Select Import Data
- Select Azure Blob Storage
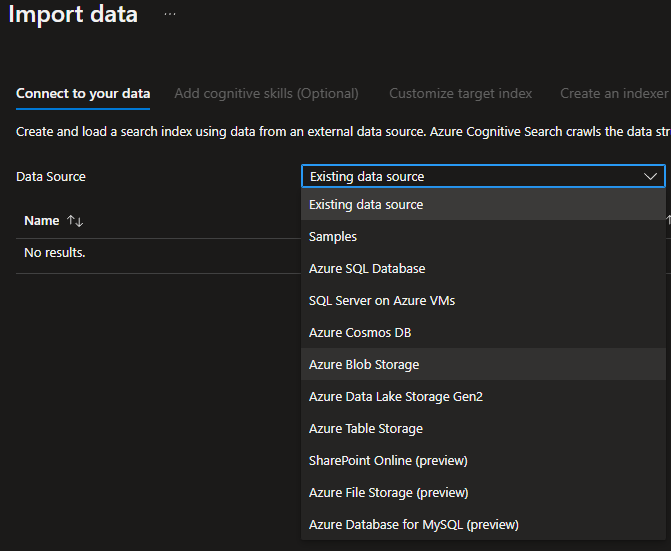
- Type in your data source name (i.e., azuredocs)
- For the Connection string, select Choose an existing connection
- Select your Azure Storage account and a container containing the Azure document repository uploaded earlier.
- Click Select
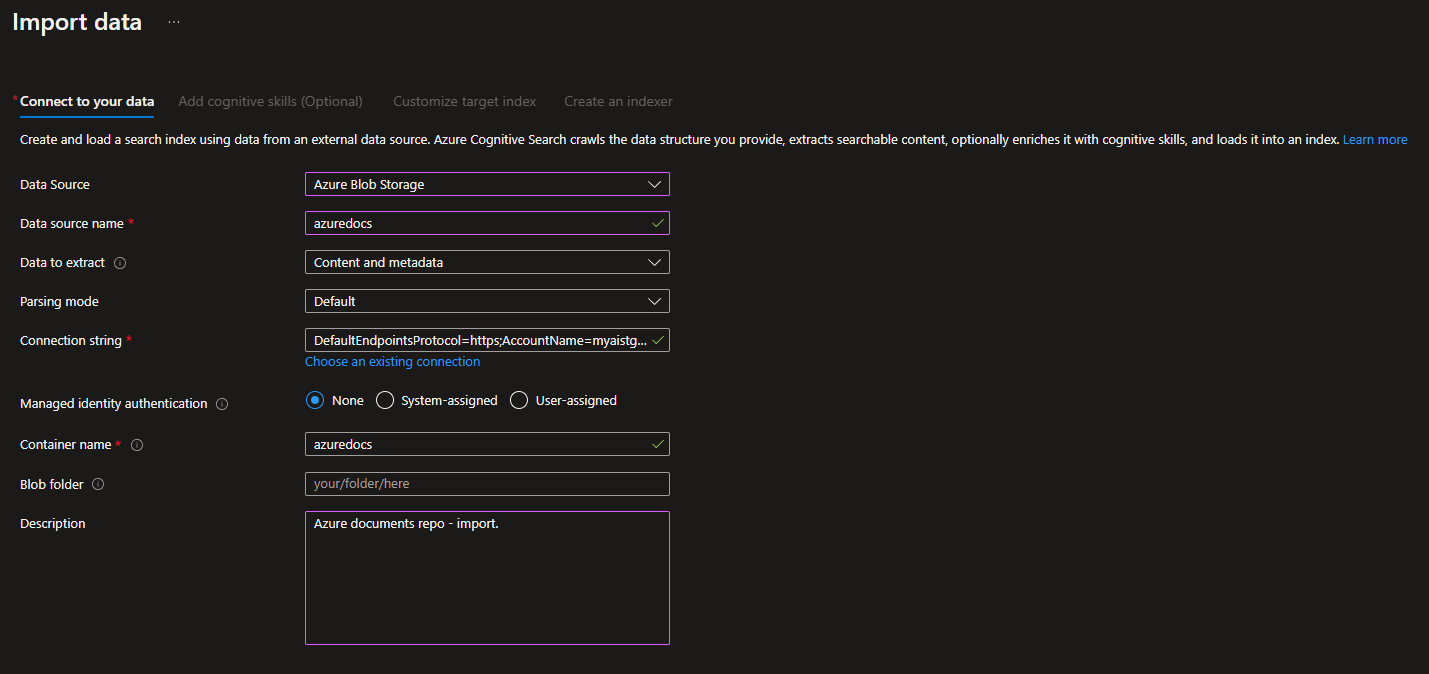
- Click Next: Add cognitive skills (Optional)
- Here, you can Enrich your data, such as enabling OCR (extracting text from images automatically) or extracting people's names, and translating text from one language to another; these enrichments are billed separately, and we won't be using any enrichments so we will select Skip to: Customize target index.
- Here is the index mapping that was done by Cognitive Search automatically by scanning the schema of the documents. You can bring in additional data about your documents if you want, but I am happy with the defaults, so I click: Next: Create an indexer
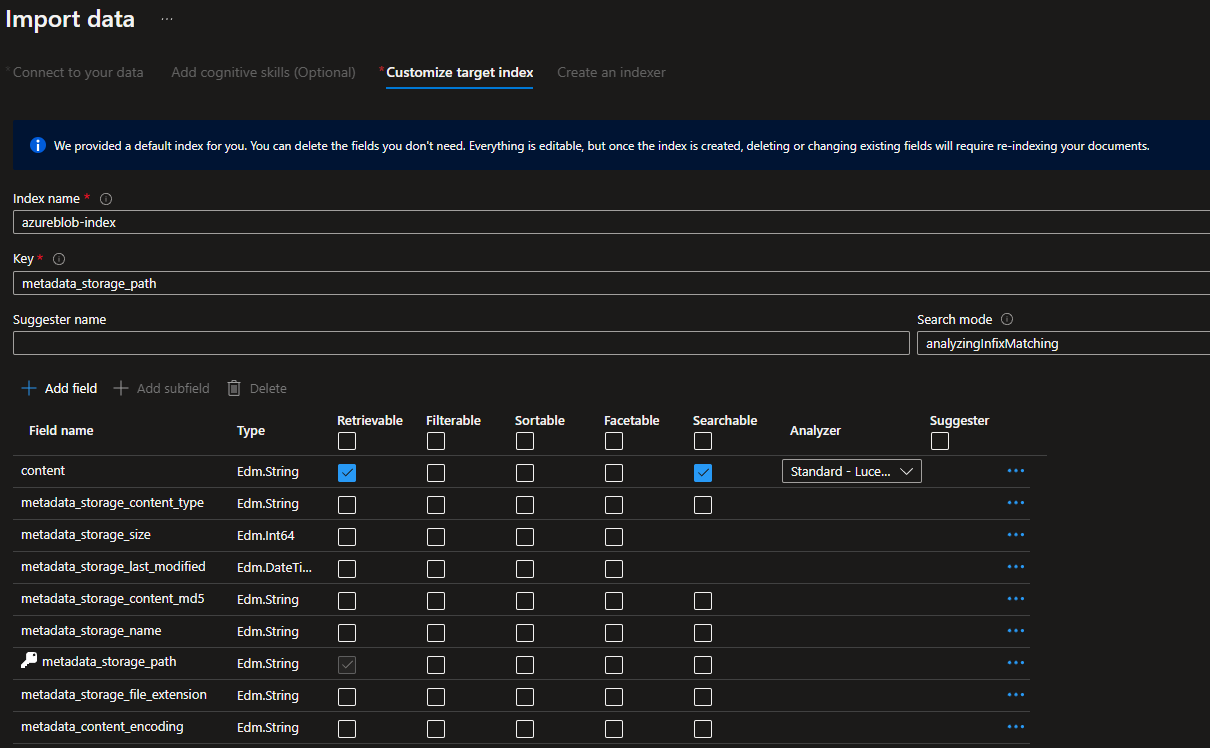
- The indexer is what is going to create your index, which will be referenced by Azure OpenAI later; you can schedule an indexer to run hourly, if new data is being added to the Azure blob container where your source files are sitting, for my purposes I am going leave the Schedule as: Once
- Uncollapse Advanced Options and scroll down a bit
- Here, we can select to only index certain files; for our purposes, we are going to exclude png files, the Azure document repository contains png images files that aren't able to be indexed (we aren't using OCR), so I am going to optimize the indexing time slightly by excluding them. You can also exclude gif/jpg image files.
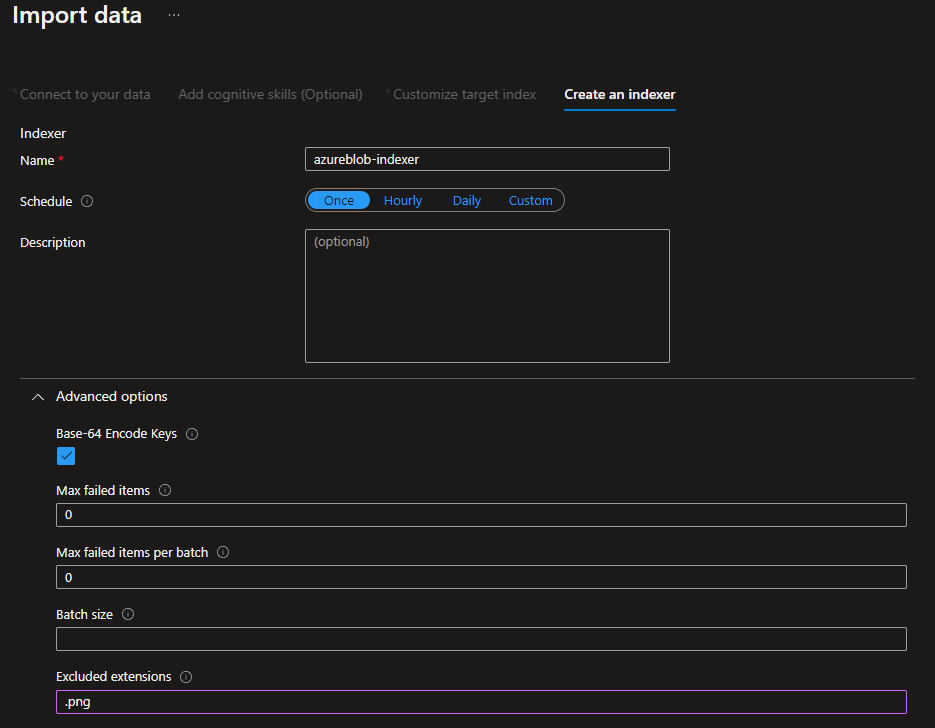
- Finally, hit Submit to start the indexing process. This could take a while, depending on the amount of data
- Leave this running in the background and navigate to the Cognitive Search resource, Overview pane to see the status.

Note: You can also run the Import Data in Azure OpenAI Studio, which will trigger an index - but you need to keep your browser open and responsive. Depending on how much data you are indexing, doing it manually through this process could be preferred to avoid browser timeout. You also get more options around the index.
Create Azure OpenAI
Now that we have our base Azure resources, it's time to create Azure OpenAI. Make sure your region and subscription have been approved for Azure OpenAI.
Run the following PowerShell cmdlets to create the Azure OpenAI service:
To create the Azure OpenAI service, we will be using the Azure Portal.
- Navigate to the Microsoft Azure Portal
- In the top center search bar, type in Azure OpenAI
- In the Cognitive Services, Azure OpenAI section, click + Create
- Select your subscription, region, name, and pricing tier of your Azure OpenAI service (remember certain models are only available in specific regions - we need GPT 3.5+), then select Next
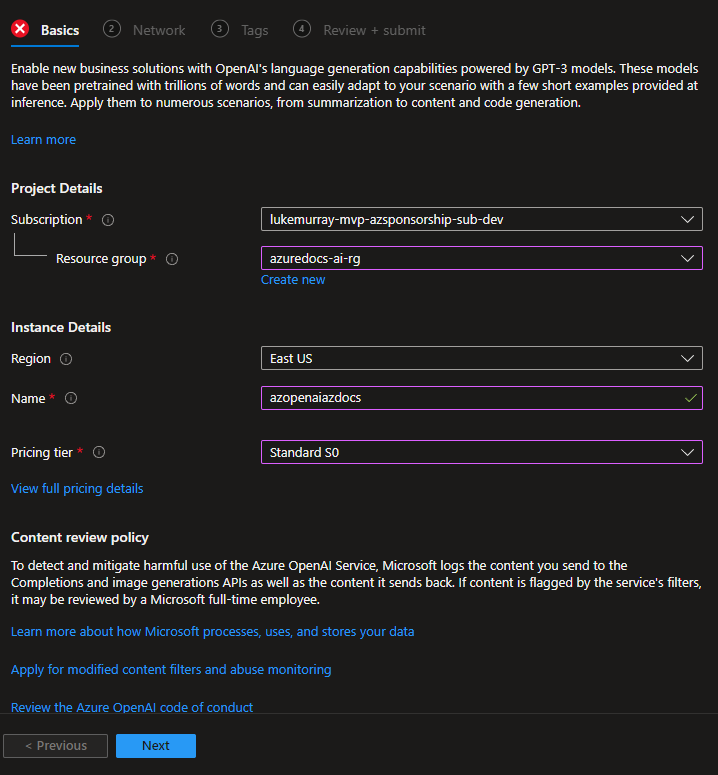
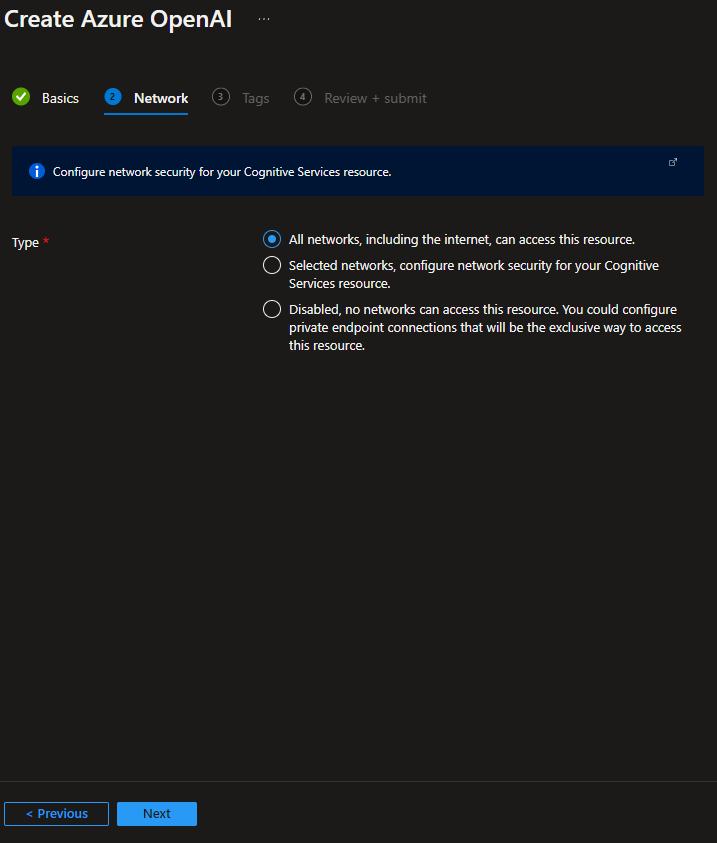
- Update your Network Configuration; for this demo, we will select 'All Networks' - but the best practice is to restrict it. Click Next
- If you have any Tags, enter them, then click Next
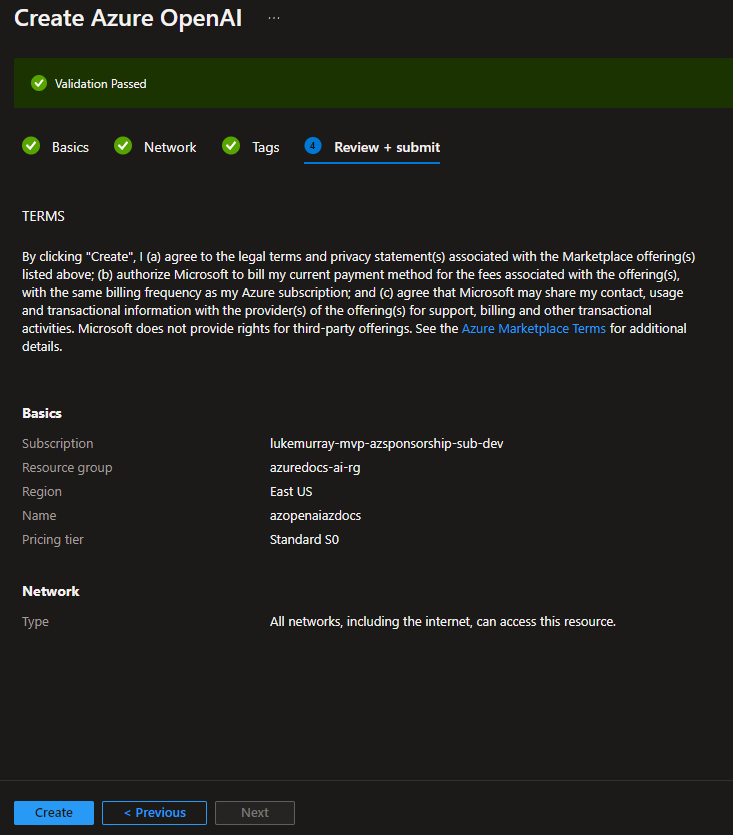
- The Azure platform will now validate your deployment (an example is ensuring that the Azure OpenAI has a unique name). Review the configuration, then click Create to create your resource.
Now that the Azure OpenAI service has been created, you should now have the following:
- An Azure OpenAI service
- A Storage account
- A Cognitive Search service
Deploy Model
Now that we have our Azure OpenAI instance, it's time to deploy our Chat model.
- Navigate to the Microsoft Azure Portal
- In the top center search bar, type in Azure OpenAI
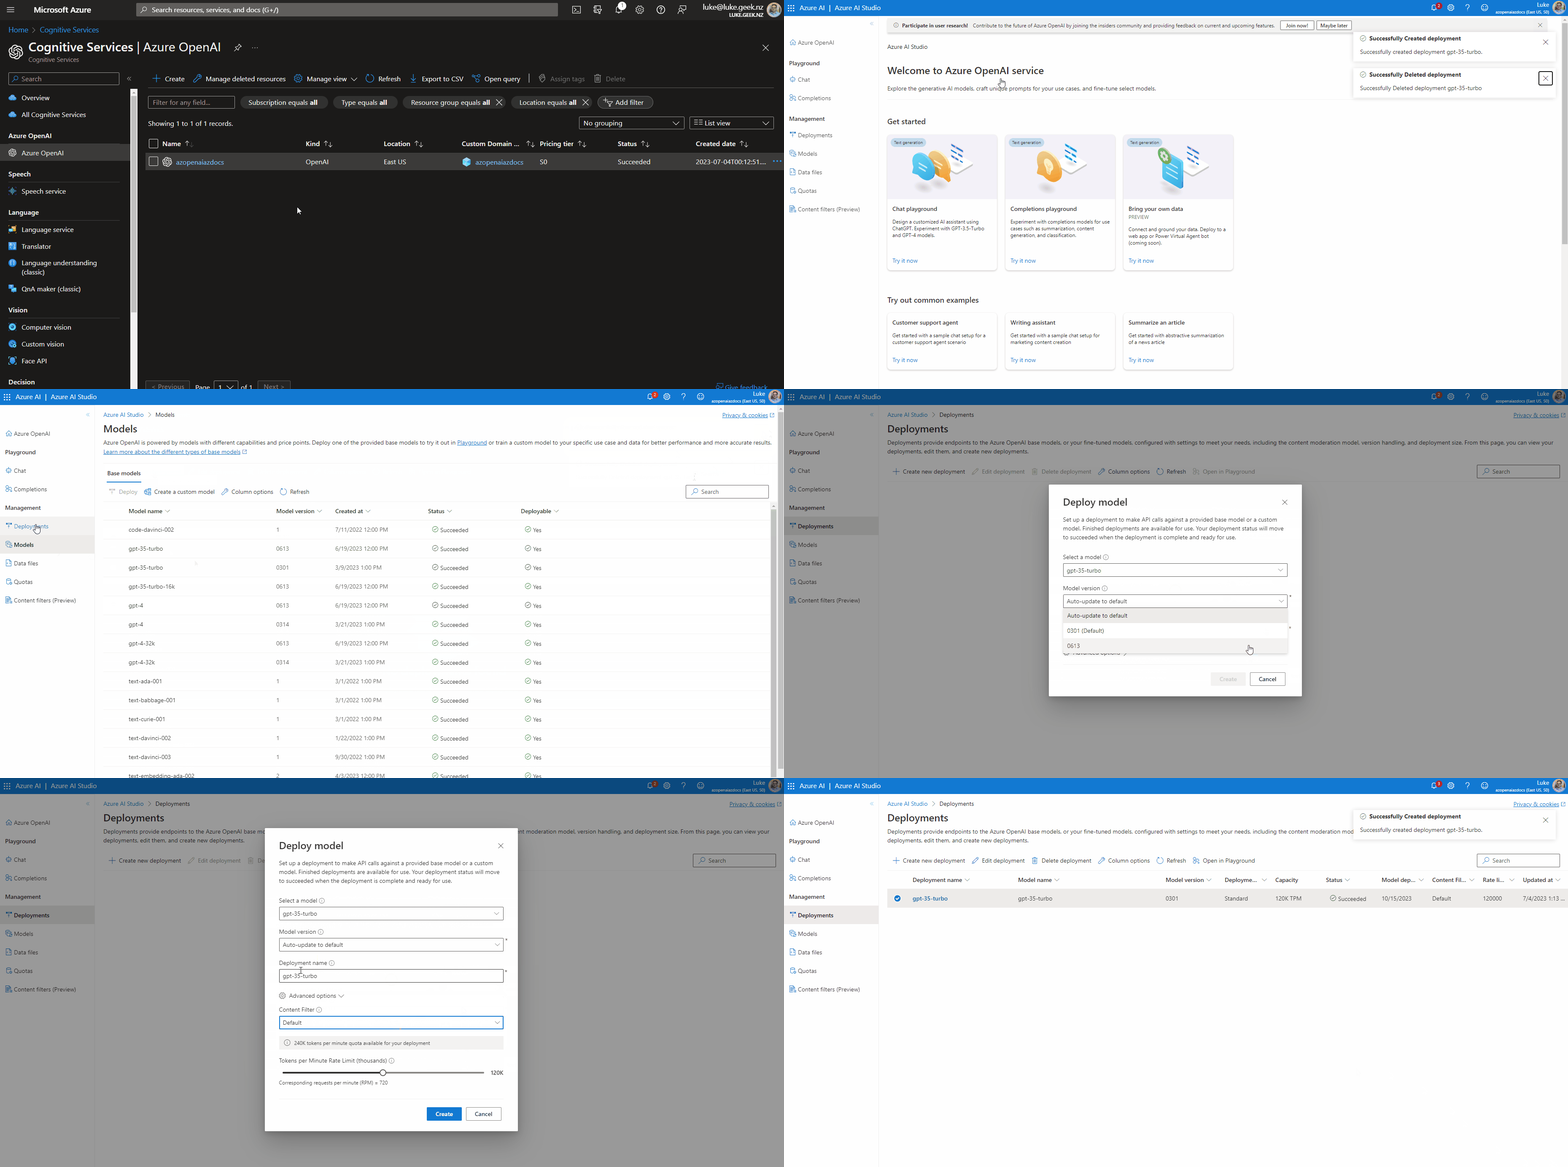
- Open your Azure OpenAI instance to the Overview page, and click: Go to Azure OpenAI Studio
- Click on Models, and verify that you have gpt models (ie, gpt-36-turbo, or gpt-4). If you don't, then make sure you have been onboarded.
- Once verified, click on Deployments
- Click on + Create new deployment
- Select your model (I am going to go with gpt-35-turbo), type in a deployment name, and then click Create
- Once deployment has been completed, you may have to wait up to 5 minutes for the Chat API to be aware of your new deployment.
Run Chat against your data
Finally, it's time to query and work with our Azure documents.
We can do this using the Chat Playground, a feature of Azure OpenAI that allows us to work with our Chat models and adjust prompts.
We will not change the System Prompt (although to get the most out of your own data, I recommend giving it ago); the System Prompt will remain as: You are an AI assistant that helps people find information.
- Navigate to the Microsoft Azure Portal
- In the top center search bar, type in Azure OpenAI
- Open your Azure OpenAI instance to the Overview page, and click: Go to Azure OpenAI Studio
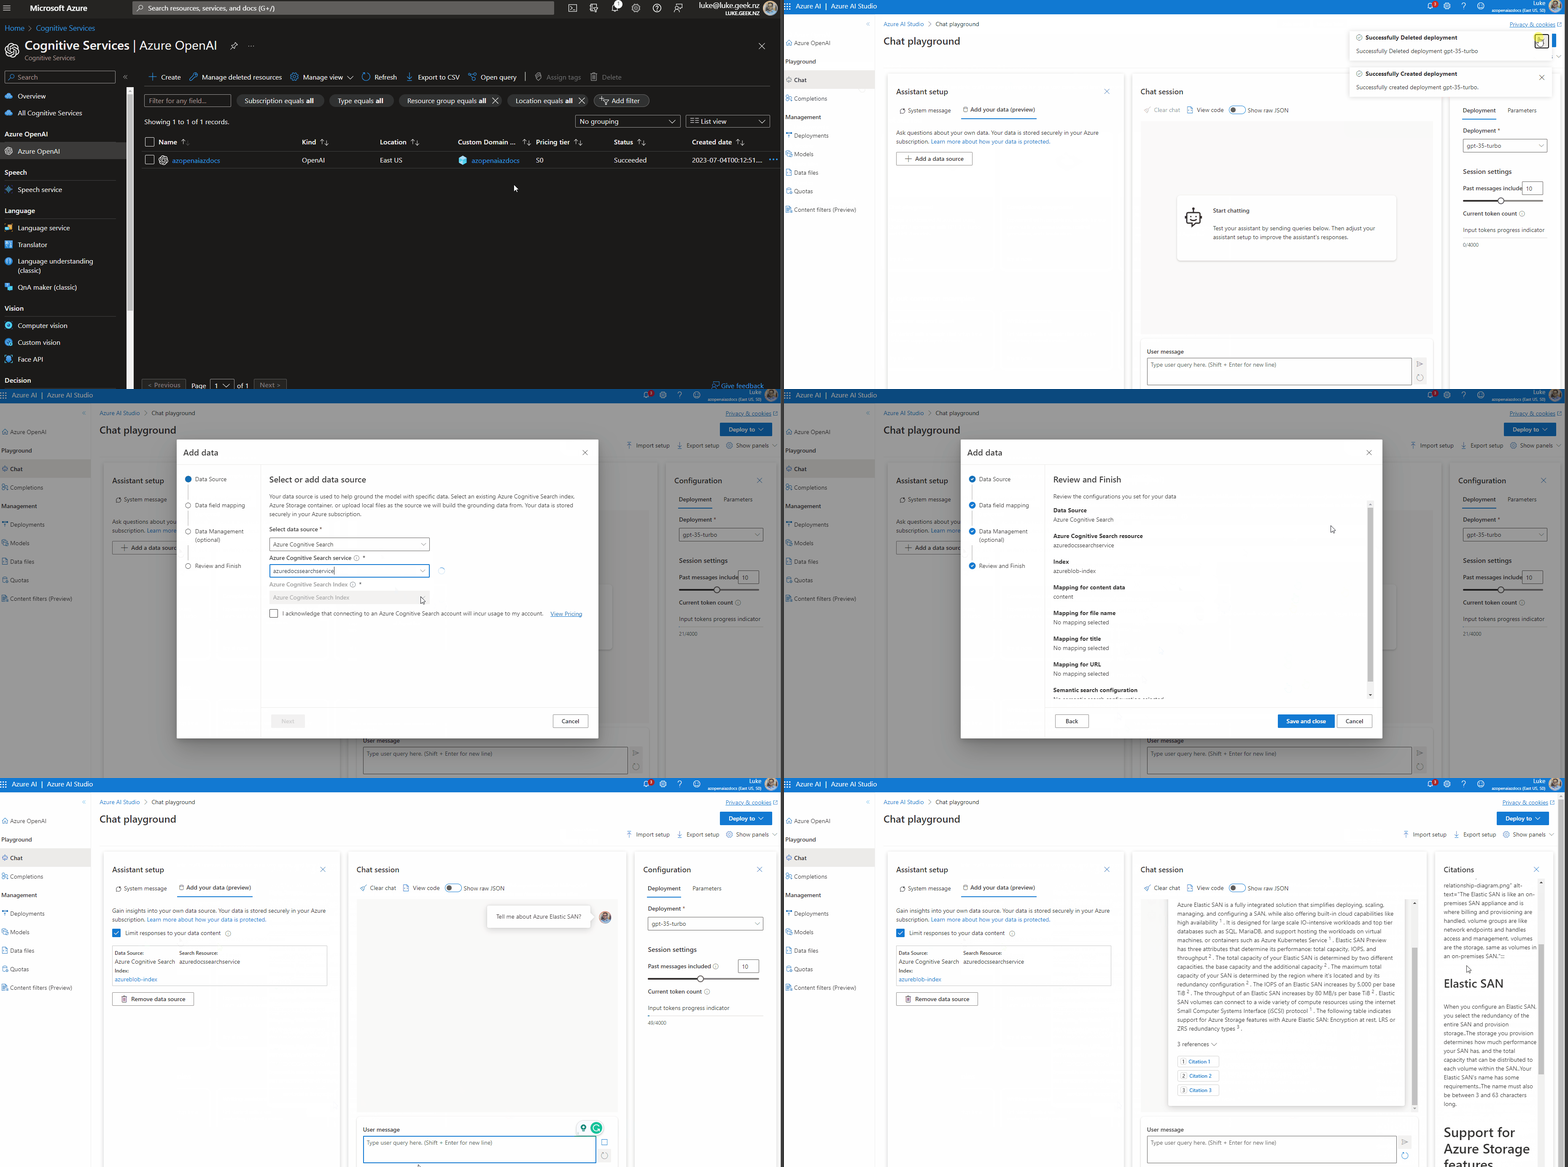
- Click Chat
- Click Add your data (preview) - if this doesn't show, ensure you have deployed a GPT model as part of the previous steps.
- Click on + Add a data source
- Select the dropdown list in the Select data source pane and select Azure Cognitive Search
- Select your Cognitive Search service, created earlier
- Select your Index
- Check, I acknowledge that connecting to an Azure Cognitive Search account will incur usage to my account. View Pricing
- Click Next
- It should bring in the index metadata; for example - our content data is mapped to content - so I will leave this as is; click Next
- I am not utilizing Semantic search, so I click Next
- Finally, review my settings and click Save and Close
- Now we can verify our own data is getting checked by leaving the: Limit responses to your own data content checked
- Then, in the Chat session, in the User message, I type: Tell me about Azure Elastic SAN?
- It will now reference the Cognitive Search and bring in the data from the index, including references to the location where it found the data!
Optional - Deploy to an Azure WebApp
Interacting with our data in the Chat playground can be an enlightening experience, but we can go a step further and leverage the native tools to a chat interface - straight to an Azure web app.
To do this, we need to navigate back to the Chat playground, ensure you have added your own cognitive search, and can successfully retrieve data from your index.
- Click on Deploy to
- Select A new web app...
- If you have an existing WebApp, you can update it with an updated System Message or Search Index from the Chat playground settings, but we will: Create a new web app
- Enter a suitable name (i.e., AI-WebApp-Tst - this needs to be unique)
- Select the Subscription and Resource Group and location to deploy to. I had issues accessing my custom data, when deployed to Australia East (as AI services are in East US), so I will deploy in the same region as my OpenAI and Cognitive Search service - i.e., East US.
- Specify a plan (i.e., Standard (S1))
- Click Deploy
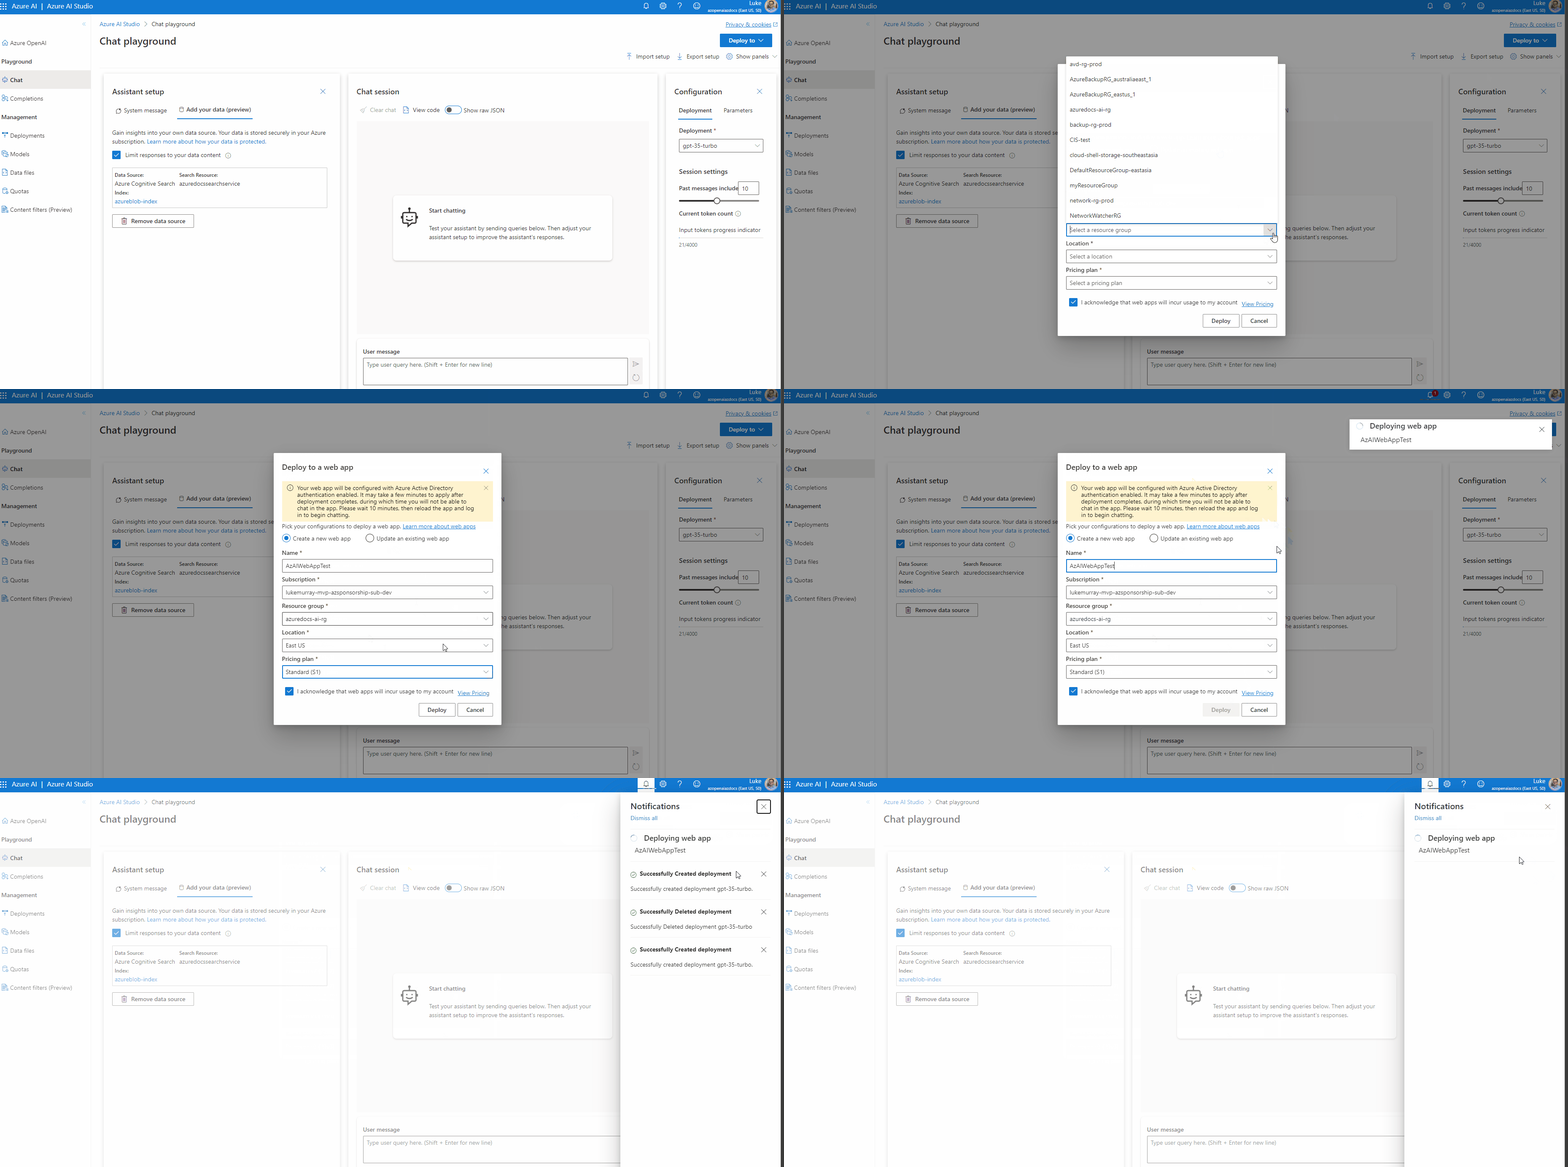
Note: Deployment may take up to 10 minutes to deploy; you can navigate to the Resource Group you are deploying to, select Deployments, and monitor the deployment. Once deployed, it can take another 10 minutes for authentication to be configured.
Note: By default, the Azure WebApp is restricted to only be accessible by yourself; you can expand this out by adjusting the authentication.
Once it is deployed, you can access the Chat interface, directly from an Azure WebApp!
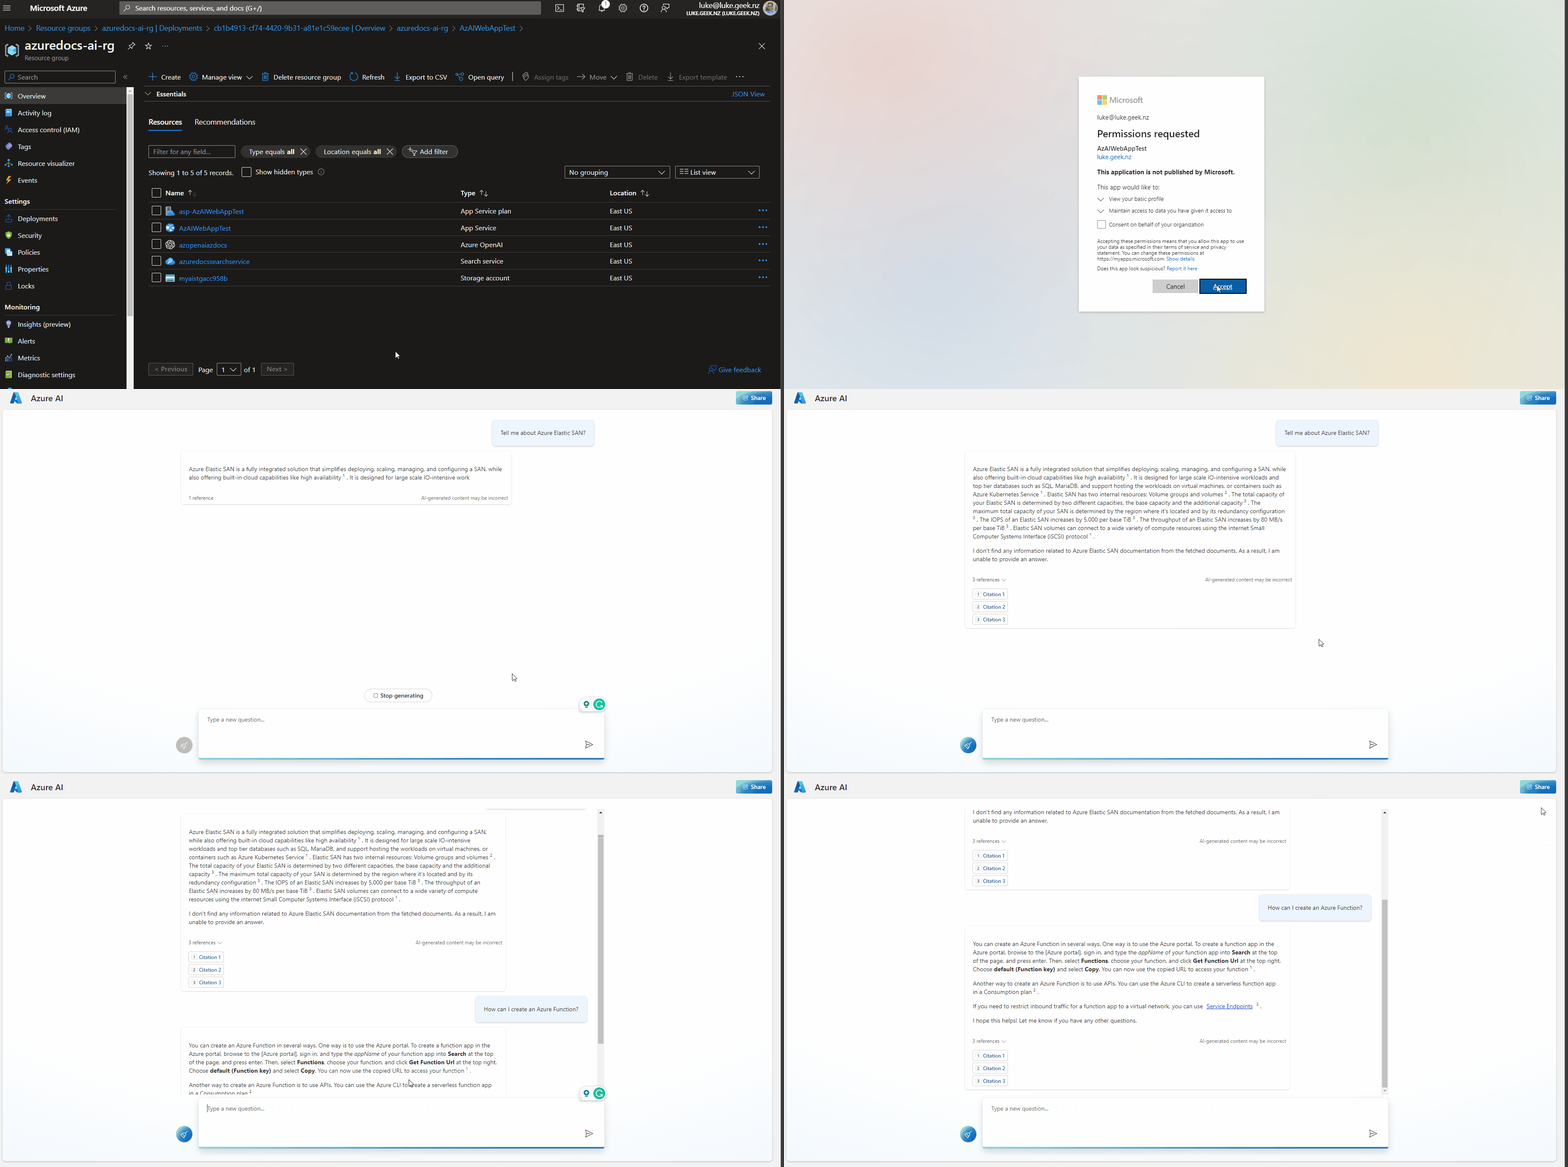
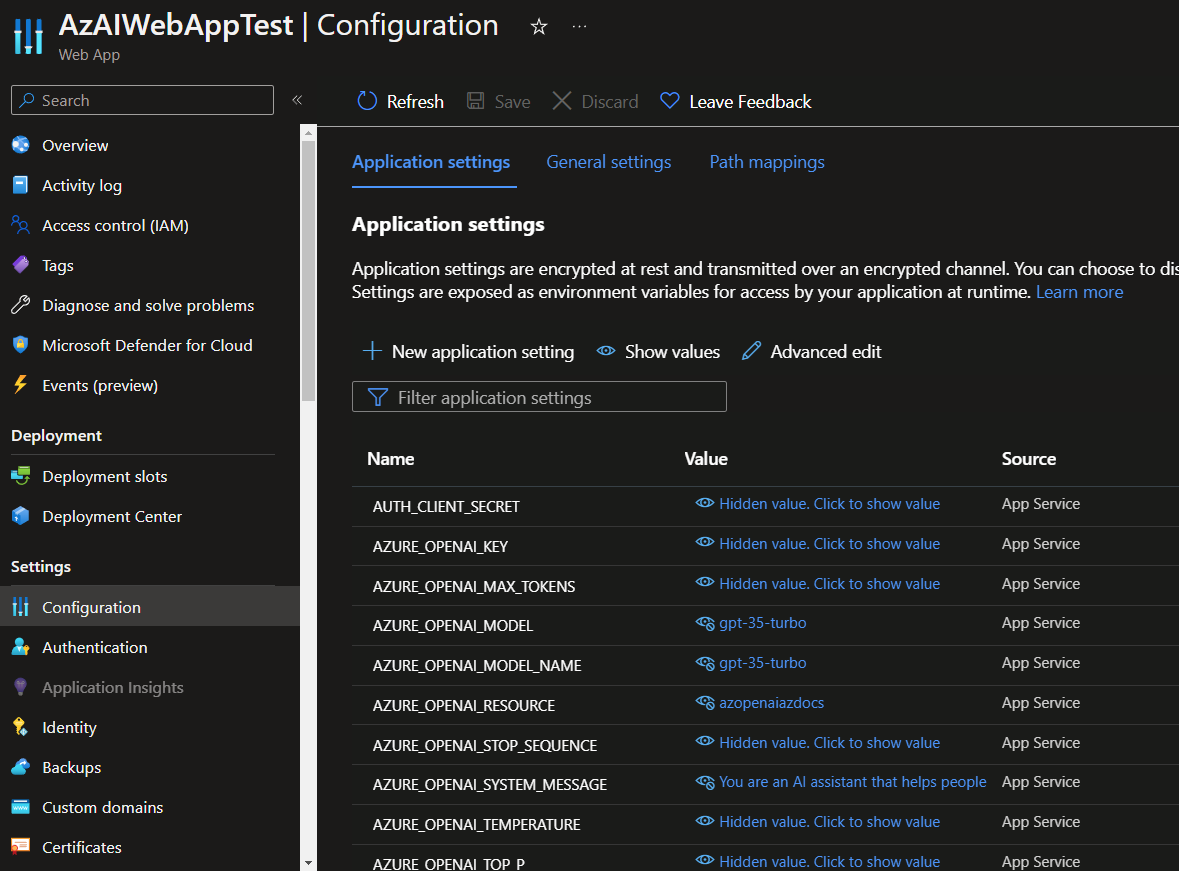
If you navigate to the WebApp resource in the Azure Portal, and look at the Configuration and Application Settings of your WebApp, you can see variables used as part of the deployment. You can adjust these, but be wary as it could break the WebApp, I would recommend redeploying/updating the WebApp for major changes, from Azure OpenAI studio.
